
Overview
The DX Spot Manager is the primary CommCat window for monitoring and analyzing DX Spots. The spots in the list can originate from a VHF/UHF Packet Cluster, Web Cluster, an Internet Telnet site, or from spots you create in CommCat.
DX Spots provide a way to monitor DX activity and band conditions. It is also possible to track the operation of specific DX stations. By analyzing a DX station's operating habits over time, it is often possible to second guess when and where they may appear next.
The spot list shown above lists incoming spots in the order they were received. CommCat provides many spot order options in addition to the order they are received. The information provided for each spot in the list includes the DX call, frequency, call of the reporting station, time, spot priority, date and day of the week, short notes the reporting station has added, the DX Bearing, continent, and grid square.
The DX Spot Manager window is divided into two panes. The right pane contains a spreadsheet showing detailed information for each spot. The left pane contains an optional sidebar that provides a number of useful tools that provide further information about spots, spot filtering, and operating aids.
Spots arrive first in the Inbox folder where they can then be redirected through the use of rules to other folders. This operation is similar to mail sorting in Microsoft Outlook.
Rules which test conditions and take action on incoming spots can be specified. Each rule contains one or more conditions and one or more actions. CommCat provides extensive sets of conditions and actions that provide much flexibility in how spots are processed, redirected, and used to notify you. Here are a few examples:
•Play a tone whenever a spot for 3Y0C is received.
•Move spots that contain "psk" in their note to a "PSK" folder.
•Delete all spots for 160 Meters.
•Shade spots that are more than 30 minutes old.
•Beep your pager when P5/4L4FN is reported on 20 CW.
•Send all CW spots to a dedicated CW folder.
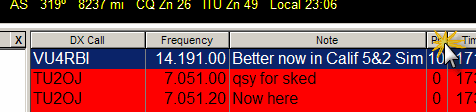
DX Spot Manager Spot Details
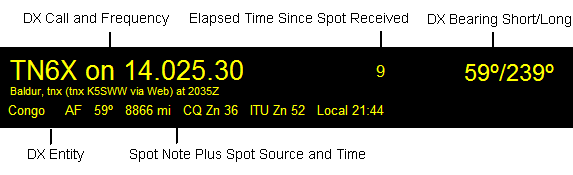
The details for selected spots appear in the Spot Detail portion of the DX Spot Manager window. In the sample above, TN6X has been reported on 14.025.30 MHz, 9 minutes ago. From the note supplied by K5SWW, we can see that TN6X's name is Baldur. This spot was received through a Web cluster and it was reported at 2035 UTC. CommCat has determined the DXCC entity to be Congo at a bearing of 59 degrees short path and 239 degrees long path. (CommCat looks up the location of the DX in the specified callbook. The bearings shown in the Bearing column are found from an internal "quick" lookup based on the station's call prefix.) It is 21:44 local time in the Congo.
DX Spot Manager Sidebar
Display or hide the DX Spot Manager Sidebar by clicking the Sidebar button on the menu bar. You can also hide the sidebar by clicking the X in the upper right corner of the sidebar panel.
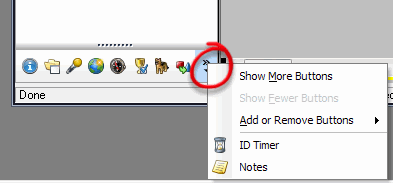
Different panels are opened by clicking their icon at the bottom of the sidebar. To show more icons, drag the dotted handle at the bottom of the sidebar up. You can remove and add panels to the sidebar by clicking the configure button on the right side of the icon bar at the bottom of the sidebar as shown below.
DX Spot Manager Sidebar Video
An video showing how to use the DX Spot Manager sidebar is available on the CommCat web site.
Spot Filters
NOTE: The Quick Filter filters spots after they have been processed by the DX Spot Manager Rule system.
Several of the panels filter spots. The filtered spot list is also used by the Band Spotter window. The Quick Filter button in the DX Spot Manager menu bar must be engaged for the filtering to work. The panels that perform filtering are:
•Bands and Modes
•Continent
•DX Bearing
•Award
•Watch
Spot Info
To display the Spot Info panel, click the Info icon in the panel list.
Click a spot in the spot list to display the Spot Info for that call.
The Spot Info panel has 5 tabs to display different information.
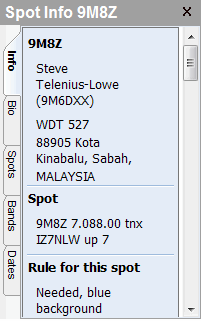
Info |
The call, name, QTH, spot details, rule used to color the spot, and worked status are shown |
Bio |
The bio for the selected call is collected from your Callbook source, including any photos |
Spots |
A list of the recent spots for this call |
Bands |
A graph of activity for this call by band and mode |
Dates |
A calendar showing the dates this call has been spotted and the number of spots each day, plus the bands and modes for the spots. (Move the mouse pointer over a date to reveal the spot totals.) |
Spot Folders
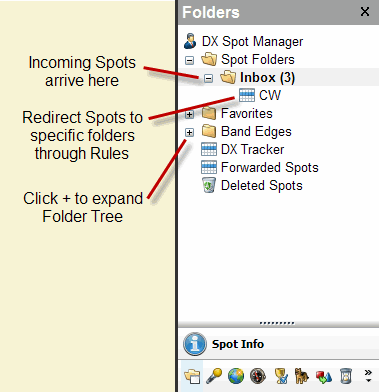
To display the DX Spot Manager Folders panel, click the folder icon in the sidebar list.
The Spot Folders are used to sort incoming spots into categories. DX Spot Manager Rules can be used to automatically move spots from the Inbox to another folder, or you can drag-and-drop a spot from the spot list directly to a folder.
CommCat provides a set of folders to get you started. You can add folders to meet your own needs, and, with a few exceptions, folders can be removed when no longer needed. The DX Spot Manager, Spot Folders, and Inbox folders are permanent and cannot be removed. Instructions for folder management are provided below.
As spots arrive, a spot counter keeps track of the number of new spots. The counter for each folder gives you the count of new spots received in the last update cycle, Three new spots have arrived in the Inbox folder. Click the folder name or double-click a spot to reset its spot counter.
The sidebar and DX Spot Manager folder list can be hidden from view. To do so, click the Sidebar button or click the X in the upper right corner of the Folder pane. To re-display the folder list, click the Sidebar button in the DX Spot Manager menu bar.
You can move through the folder list using the Next Folder and Previous Folder options in the View menu. If you wish to limit the folders you will visit with the Next and Previous selections, open the Folder Preferences window from the View menu where you can choose which folders you want included. Use the Go to Folder View menu option to go directly to a folder.

Bands and Modes
To open the Bands and Modes panel, click the Microphone icon.
The Bands and Modes panel provides a quick way to filter spots in the spot list. The Quick Filter option in the DX Spot Manager menu bar must be selected for the filtering to be applied.
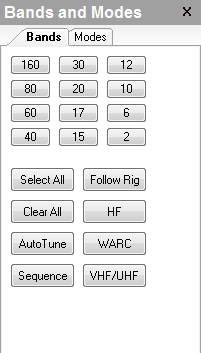
Click a Band button to show spots for that band. To add bands to those previously selected, use Ctrl+Click. The buttons below the band buttons operate on groups of bands. Follow Rig displays spots on the band to which the rig is tuned. AutoTune can be selected so the radio is tuned with a single click. The Sequence button shows spots band-by-band when you have selected more than one band. Each band is shown for approximately 10 seconds.
Click the Modes tab to show the mode filters. Click a mode button to add a mode filter to the band filter. To show more than one mode, use Ctrl+Click.
To reset all filters, right-click over the Bands or Mode panels and select Reset All Filters. You can also turn off all filters by clicking the Quick Filter button in the DX Spot Manager menu bar.
Continent
To open the Continent filter panel, click the World icon.
The Continent filter adds filtering to any choices you have made on other panels.
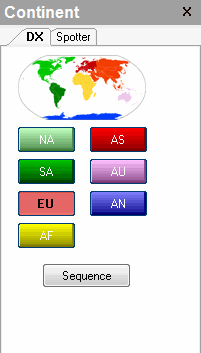
Click a Continent button to display DX spots from that continent. To select more than one continent, use Ctrl+Click. In the panel above, EU (Europe) has been selected. The button colors are a key to the world map, they do not result in the color for a spot being changed.
You can also filter spots by the continent of the Spotter. Click the Spotter tab to display the continent choices, and click a continent button to show spots whose spotters are from that continent. To select more than one continent, use Ctrl+Click.
The Sequence button can be used to cycle through the selected continents when you have selected more than one. Each continent is show for approximately 5 seconds.
DX Bearing
To open the DX Bearing filter, click the compass icon in the panel list.
The DX Bearing filter adds filtering to any choices you have made on other panels.
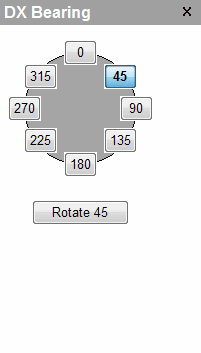
Click a DX Bearing button to view spots for DX at that bearing. To select more than one bearing, use Ctrl+Click. To rotate you beam to the selected bearing, click the button below the bearing buttons.
Awards
To open the Awards filter, click the cup icon in the panel list.
The Awards filter adds filtering to any choices you have made on other panels.
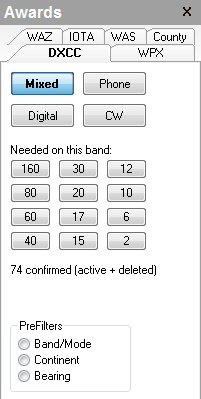
The Awards filter provides a quick way to look for spots that will satisfy a need you have for a particular award. The available awards are DXCC, WPX, WAZ, IOTA, WAS and County. The Mixed button is selected above, so any spots that would qualify for a needed DXCC entity, mixed mode, will appear in the spot list.
Only one award can be selected as a filter at one time.
The Prefilter group indicates the status of the Band/Mode, Continent, and Bearing filters. If one of the prefilters is in use, a dot shows next to the respective filter in the list.
Watch
To open the Watch panel, click the "watch dog" icon in the panel list.
The Watch panel can be used to filter spots in the spot list, or to watch for a specific spot.
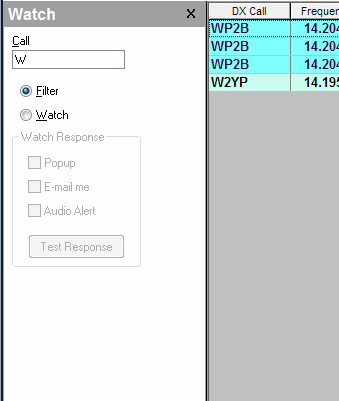
The filter mode for the Award panel is shown above. The letter W has been entered, so all spots containing a W are shown. If you want to look for multiple calls, separate the calls with a comma. For example, WP2B,W1AW will find spots for WP2B and W1AW.
The Watch mode responds with a selected response when a spot matches the entered letters. Select a Popup, e-mail, or audio alert. If you use Popup, you can click the frequency on the popup to tune there (the first frequency in a list is used. Click the call list in the popup to set the Quick Filter for the DX Spot Manager to the calls in the popup. You can also set the timeout for the popup in File>Settings>Spots>DX Notify Popup.
Convert
The Convert panel is an operating aid. It allows you to easily convert between different unit systems, such as meters to feet.
Open the Convert panel by clicking the geometric icon in the panel list.
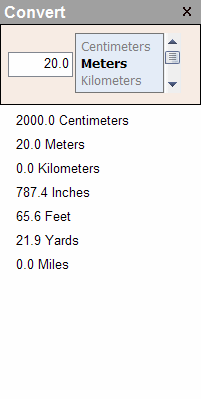
The image above shows that 20 meters is equal to 65.6 feet. Click the up and down arrow buttons to the right of the units window to select the starting units. Enter the value you wish to convert in the value box.
ID Timer
The ID Timer is an operating aid. It provides an alarm to remind you to ID your station in a long QSO.
Open the ID Timer panel by clicking the alarm clock icon in the panel list.
|
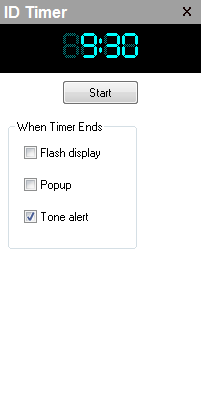
The timer is preset to 9 minutes 30 seconds. Click Start to start the timer. When the time reaches 0, the alarm is activated. The alarm can flash the clock display, display a popup alert, or sound a tone. As the timer goes negative (indicating the time has exceeded 9 minutes 30 seconds), the timer display changes to red.
Notes
The Notes panel is an operating aid. Enter any notes on the panel regarding information you wish to preserve. The Notes panel is also available form the Advanced Log.
Open the Notes panel by clicking the note icon on the panel list.
|
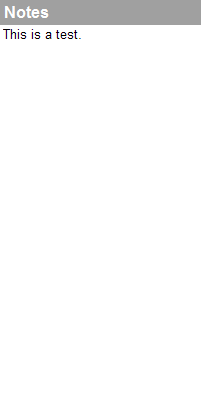
Drag a spot from the spot list, or a QSO from the Advanced Log to include that info in the Note.
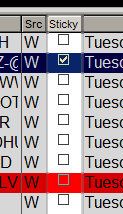
Sticky Spots
Spots older than 30-60 minutes are often out-of-date. Perhaps the band conditions have changed, the DX station has ceased operation, or she has moved to another frequency or band. For this reason, CommCat provides an adjustable expiration time for incoming spots. Spots that are older than this time limit are deleted from the spot list the next time the list is refreshed.
There are situations, however, where you may find it desirable to retain spots indefinitely. Spots you wish to retain can be made "sticky" so they are not deleted once they are older than the time limit. Sticky spots can be used for:
•Tracking DX stations to determine their operating habits.
•Retaining frequencies of interest, such as broadcast stations or nets.
•Identifying band edges for use as a tuning aid in the Spectrum Analyzer and Band Spotter windows.
There are several ways to make a spot sticky. To create a sticky spot automatically, create a Rule that has a "sticky" action. To set a sticky spot manually, right click over any selected spot in the spot list and click the Sticky menu option, or click the Sticky check box for that spot. Finally, you can drag-and-drop spots from any folder to the DX Tracker or Band Edges folders which are permanently sticky.
Prioritizing Spots
The spot priority can be set automatically or manually. CommCat DX Spot Manager Rules can contain an Action that can set the priority of a spot. Priorities of 0 (lowest/no priority) to 10 (highest priority) can be set. To set the priority manually, right click over the selected spot and choose Set Priority... from the menu. The Pr column in the DX Spot List shows the priority that has been assigned to each spot.

To sort the spot list in priority order, click the label at the top of the Priority column, labeled Pr. The spots are shown from highest to lowest priority. Click Pr again to show the spots in low to high priority order.
The spot priority is used in the Band Spotter window to determine the order in which spots are painted. Higher priority spots are painted last and appear on top of earlier spots. If a frequency is occupied by more than one spot, the spot with the highest priority shows.
Displaying Spots in Other Windows
In addition to the DX Spot Manager spreadsheet, spots processed by the DX Spot Manager appear in three other windows.
•The Great Circle Map window displays spots with radials from your location to the DX location.
•The Spectrum Analyzer window displays spots that show the reported spot frequency on the spectrum display.
•The Band Spotter window shows spots-vs-frequency in an adjustable bandwidth centered on your operating frequency. Select a folder in the DX Spot Manager to show the spots in that folder in the Band Spotter.
The color of the spots is determined by color actions you have defined in DX Spot Manager rules. Only spots in the Inbox folder or a child of the Inbox folder are shown on the Great Circle Map. These spots, as well as spots in the Band Edge folder, are shown on the Spectrum Analyzer and Band Spotter.
The Advanced Log window lists all previous contacts for the selected spot. If you have worked a station on the current band and mode, the selection bar in the Log window is painted in light red to alert you about a possible duplicate contact. There is also an option to sound a tone alarm when a possible dupe is found.
Tuning to a Spot Frequency
Double-click any spot in the spot list to tune your radio to the spot frequency. This action set the Focus DX call and enters the DX call into the Log window. If CommCat determines that the DX station is operating split (by analyzing the note for that spot), the split frequency is also set. The Space Bar can be used in place of double-clicking a selected spot to set the frequency.
When the AutoTune check box (Files>Settings>Spots) is checked, the radio is tuned to the spot frequency whenever the selected spot in the spot list changes. Autotuning is convenient when you wish to scroll through the spot list using the arrow keys with the radio automatically tuning to the spot frequency.
You can also right-click any spot and choose Tune from the menu to tune to the spot frequency.
To prevent the radio from being tuned, but allow all other functions to operate when a spot is selected, hold the Ctrl and Alt keys down while double-clicking a spot. This operation allows you to check the status of spots while monitoring a specific frequency.
Finally, you can define a rule that contains a "tune radio to spot" action.
Instant Web Page for spots
Click a call in the DX Call column to open the Instant Web Page for that call. Click a call in the From column to open the Instant Web Page for the spotter. This option is enabled in File, Settings, Spots Settings, DX Spot Manager, Call Lookup. Underlines can be applied or hidden for the calls in the two columns by using the check box in File, Settings, Spots, DX Spot Manager, Grid Options.
If you use the DXpedition Condition in a Rule to highlight spots that represent a DXpedition, click the DX Call for the spot to view the DX Bulletin information for that spot in the Instant Web Page (CommCat Live only).
Entity Status
Click the Entity Status button (or press Ctrl+I) to open the Entity Status window for a selected spot. You can show the entity status for the DX Spot by clicking the DX call, or for the spotter by clicking the Spotter call. (Note: you must have the Single-click Call sign Lookup option in Spots settings checked for this lookup to work.) When you double-click a DX spot to tune to the spot frequency, the Entity Status is updated.
DX LoTW Status
The LoTW status for DX spots is shown in the LoTW column. The status (Y or N) is found by using a database of callsigns known to be using LoTW. See LoTW Users in the Maintenance topic of Help to learn how to maintain the LoTW Users database.
Special Folders
CommCat treats several spot folders in special ways. These special folders are permanent folders which cannot be deleted or renamed. Any number of child folders can be added to these special permanent folders. The special folders are described below.
Inbox
All spots pass through the Inbox folder and remain there in the absence of any rule actions that could move or delete them. Spots in the Inbox (or in any Inbox child folder that you add) are displayed in the Great Circle Map, Spectrum Analyzer, and Band Spotter windows.
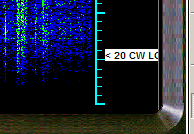
Band Edges
Spots can be moved to any Band Edge folder using a Rule action, or dragged from any folder. Spots that are dragged are automatically made sticky. Band Edge spots are displayed on the Spectrum Analyzer and Band Spotter windows as a tuning aid.
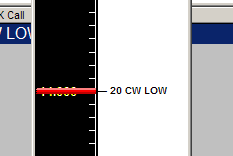
It is easiest to create a band edge spot when you have set up CommCat to allow local spots to be entered. This option is enabled from the File, Settings, Spots window. In the Local Spot Destination group, check Spot Manager. Spot announcements, including local spots, are created from any window by pressing Ctrl+S. In the call box type a short description, such as 20 CW LOW. Enter 14.000.00 in the frequency box, and press Enter. The new Band Edge spot is sent to the DX Spot Manager. From there you can drag the spot to the 20M Band Edge folder.
Spectrum Analyzer Band Edge |
Band Spotter Band Edge |
 |
 |
DX Tracker
The DX Tracker folder is normally used to hold spots for DX stations you are tracking. Spots can be sent to the DX Tracker folder (or any DX Tracker child folder you add) with a rule action, or dragged and dropped from any other folder. When you drag a spot to a DX Tracker folder, the spot is made sticky.
Deleted Spots
The Deleted Spots folder holds spots that have been deleted. The sticky property of a spot is removed when a spot is deleted, so that all deleted spots are removed from the Deleted Spots folder the next time the spot list is refreshed. Spots can be deleted from a folder manually or automatically.
To delete a spot, select it in the spot list and press the Del key, or choose Delete Spot from the right mouse menu. Except for the special folders, entire folders can be deleted with their contents ending up in the Deleted Spots folder. Spots can be deleted automatically by creating a Rule with a Delete Spot action.
Folder Status
As new spots are added to folders, the number of spots added since the folder was last viewed is updated and added to the folder name. If a spot is added to a folder that isn't visible because that particular branch is collapsed, the branch is expanded to give you a view of activity. When you open the folder for viewing, the spot number is reset. This feature provides a way for you to review spot activity while you have been away from your computer. Click the Spot Folder folder so that no spots numbers are showing. As spots arrive, activity is immediately apparent by observing the spot numbers on each folder.
Important: You must have at least one Rule assigned for the folder spot numbers to appear. See below.
Telnet Spots
Through an Internet Telnet connection, CommCat can tap into a continuous flow of spots. There are many Telnet spot servers throughout the world. It is possible to find sites that cater to local geographic areas or special modes.
To establish a Telnet connection, double-click the Telnet status panel in the CommCat status bar, or open the Telnet window from the Tools menu. Once a connection is established you can close the Telnet window and spots continue to flow to the DX Spot Manager.
To view the incoming Telnet data within the DX Spot Manager window, drag the colored bars at the bottom of the DX Spot grid up.
Web Cluster
DX Summit is a popular web site that provides continuously updated DX spots. The spots originate from other sites which feed DX Summit, or from individual users entering spots through the Internet. In addition to spots, DX Summit provides announcements which are short notes or comments from other hams.
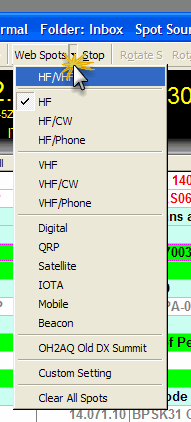
CommCat provides a number of ways to request spots. Click the down arrow next to the Web Spots button on the DX Spot Manager toolbar to see the list of possibilities. For example, click the HF item to ask for spots that are from the HF bands, including Phone and CW spots. The Custom Setting is a URL you can enter in the File, Settings, Spots, DX Summit, URLs window.
The selection you make from the list is used for Auto Updates and when you click the Web Spots button on the toolbar.
Spots can be updated automatically or manually. The number of minutes since the last update is displayed in the status bar at the bottom of the DX Spot Manager window.
To update the spot list manually, click the Web Spots button on the DX Spot Manager toolbar. To have the spots updated automatically on a periodic basis, put a check in the DX Summit Auto Update box in the File, Settings, Spots, DX Summit, Preferences window. The number of minutes between updates (Spot Update Interval) is set in the DX Spot Manager, List window.
As spot requests are sent to DX Summit, the connection status is displayed in the bottom status bar on the DX Spot Manager window. If you wish to stop a data retrieval cycle, click the Stop button next to the Web Spots button on the DX Spot Manager toolbar.
More complete interaction with DX Summit can be achieved through the Internet Cluster window, accessible on the CommCat Tools menu. It is not necessary to have the Web Cluster window open to receive spots.
To view the raw incoming Web Cluster data within the DX Spot Manager window, enable the Incoming Data option in the DX Spot Manager View, Layout menu. Drag the colored bar up at the bottom of the DX Spot Grid.
Packet Spots
VHF or UHF repeaters that are designed to provide spots through packet protocol are called Packet Clusters. Packet clusters generally serve a limited geographic area, but are often linked to other nearby Packet Cluster repeaters providing a network than can cover one or more states. The parameters necessary to connect to a Packet Cluster repeater are located on the Packet Cluster tab of the File, Settings, Spots window.
For CommCat to receive spots from a Packet Cluster, you must have a VHF or UHF radio and a TNC (Terminal Node Controller). CommCat processes spots as they are received from the Packet Cluster.
More complete interaction with the Packet Cluster can be achieved through the Packet Cluster window, accessible on the Tools menu. It is not necessary to have the Packet window open to receive spots in the DX Spot Manager window.
To view the raw incoming Packet data within the DX Spot Manager window, enable Incoming Data in the View menu, and drag the colored bars up at the bottom of the DX Spot Grid.
Sending a Command to the Telnet Site or Packet Node
Press Ctrl+X to open the Send window. Special commands, such as SH/DX, can be sent to the Telnet site or Packet Node by entering them in the text box and clicking OK. You must be connected to a Telnet site or Packet Node.
Customizing the DX Spot Manager Window
View
Use the View, Layout menu to customize which information panels will appear on the DX Spot Manager window. The following options are provided:
•Status Bar
•Folder List
•Incoming Data
•Bottom Status Bar
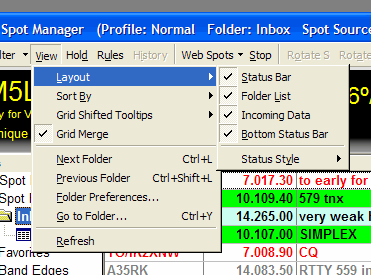
Each of the three information panels can be shown or hidden by checking or unchecking the menu item.
Three incoming data panels, showing raw Web, Telnet and Packet can be opened below the spot grid. To close or open any of the data panels, start by disabling or enabling the Incoming Data option in the View menu.
Customize the Status Bar
Four DX Spot Manager status bar styles are available from the View, Status Style sub menu:
KL7 Winter

KC4 Summer

LCD

Map

You can reverse the position of the spot timer and bearing readouts in the status bar by clicking the Reverse Time/Bearing Positions menu item. See below for how the bar looks with these items reversed.

Panel Size
The size of the DX Spot Manager window and the width of the Folder panel can be changed by dragging the associated window or panel border. When the width of the spot list is less than the grid, a horizontal scroll bar allows you to scroll the spot list. In addition, the spot list can be split, allowing you to view two portions of the spot list. To split the spot list grid, drag the split box that appears on the left end of the horizontal scroll bar.
Column Width
The width of any spot list column can be adjusted by dragging the associated separator line in the spot list header.
Column Position
The order of columns in the DX Spot Manager list can be changed to suit your preferences. To move one or more columns, right-click over the grid and choose Move Columns from the menu. Select the column or columns you wish to move by clicking their headers. Drag the header of the selected column to its new position. To exit the Move Column mode, right-click the mouse over the grid and choose Move Menu to remove the check mark.
Spot List Background and Foreground Colors
Normally the Spot Grid has a white background and black letters when a Rule hasn't painted a spot. You can change these default colors to any color you wish. The colors are set in the File, Settings, Spots, DX Spot Mgr window.
Spot List Horizontal Lines
Normally the Spot Grid does not have horizontal lines separating the spots. You can add lines in your choice of several formats in the File, Settings, Spots, DX Spot Mgr window.
Spot List Font
The font style and size of the DX Spot Manager grid and folder list can be changed from the File, Settings, Program, Font window.
Spot Order
Spots are normally shown in the order they are received by CommCat. The list can be sorted by any column by clicking the header of the column you wish to use, or through the View, Sort By menu. For example, to sort the list by DX call, click the DX Call header. Clicking it again sorts the list in the opposite order. To return the spot list to the original (unsorted) order, click the Reset Order option on the right mouse menu, or choose Order Received in the DX Spot Manager View menu. The current list order is displayed in the status bar at the bottom of the DX Spot Manager window. The following spot orders are provided:
•Order Received
•DX Call
•Frequency
•Note
•Priority
•Time Received
•Date/Time Received
•Source
•Spot From
•Spotter Distance from your QTH
•Keep
•Day of Week
•Entity name
•DX Bearing
•Grid Square
•Continent
•LoTW Status
Add a Folder
Folders can be added to the DX Spot Manager folder list. Once a folder has been added you can create rules with actions that transfer spots to the new folder, or you can drag-and-drop spots directly to the folder.
To add a folder, select a folder in the folder tree, then right-click to open the Add Folder dialog. Enter a name for the new folder. (Note that a folder name can only be used once in the folder tree.) Next select the folder under which you want the new folder to appear. Click OK to finish adding the new folder.
Rename a Folder
To rename a Folder, select the Folder you wish to rename, then right-click the mouse. Choose "Rename" from the menu. The Enter Folder Name dialog opens allowing you to enter the new name. Note that a folder name can only be used once, and that several special folders cannot be renamed. The Rename option is disabled when you attempt to rename one of these special folders. Any rules that use the renamed folder are updated to use the new name.
Remove a Folder
Select the folder you wish to delete, then click the right mouse button. Choose "Delete" from the menu. Note that several folders cannot be deleted. For these special folders, "Delete" is disabled in the right mouse menu. When you delete a folder, any rules that use the deleted folder are updated to show that a folder has not been specified. It is necessary to modify any rule actions that use the deleted folder to include a new folder name. Rules that Copy or Move spots to a deleted folder no longer perform that action until you replace the destination folder.
Moving DX Spot Manager Out of the CommCat Main Window
If you wish to move the DX Spot Manager window out of the Main CommCat window, check the DX Spot Manager option on the File, Settings, Program, Window Position window. This option is useful if you want to display the DX Spot Manager window while using another program, or you have a dual monitor system.
Spotlist default foreground and background colors
Normally the spot list uses a black font with a white background for spots that have not been colored by a Rule Action. You can change the default background and foreground colors in File, Settings, Spots Settings, DX Spot manager, Grid Options.
Toolbar
Sidebar
Hide and show the DX Spot Manager Sidebar with this button.
Quick Filter
Click the down arrow on the Quick Filter button and Choose Band Filter Settings from the Quick Filter menu to open the Band Filter window.
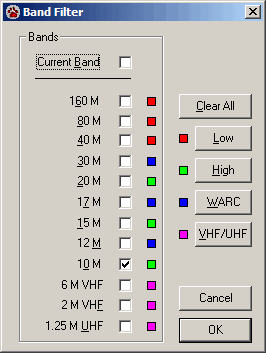
Use the Band Filter to reduce the number of spots displayed. For example, if you are operating in the CQ Magazine 10 meter contest, you can display only 10 meter spots. You can include spots from the current band, a single band, or a selection of bands. The Band Filter does not use the Rule system, rather it processes spots after they have been processed by the Rules. Even though you do not see the spots in the Spot List that are hidden by the Band Filter, they remain in the list. To engage the Band Filter, click the Band Filter button on the DX Spot Manager menu bar.
Two types of Band Filtering are provided. To make a selection, click the down arrow to the right of the Band Filter button to open the Band Filter window. You can limit the spots to the "Current Band" or to a combination of specified bands.
The Current Band option hides all spots in the spot list except those on the same band as your radio. As you tune from one band to another, the filtering tracks the current band.
You can also specify a band or set of bands you wish to monitor. When a band is selected a check mark appears next to the band name. Click a band name to add or remove a check mark. When a band is checked, spots for that band do not appear in the spot list.
The Band Filter settings in the DX Spot Manager also apply to the Great Circle Map.
View
Add or remove information panels from the DX Spot Manager window, change the status pane style, refresh the spot list, or set the order of spots in the list. The current spot order is displayed in the right pane of the DX Spot Manager status bar.
Grid Shifted Tool tips provides a way to show different spot data in the tool tips as you move the mouse pointer over the spot list. The normal tool tip shows spot call, spotter, frequency, and spot note. By pressing Ctrl+Shift the tool tips are switched to their alternate mode which can be the underlying rule for the spot, or the worked status for the spot. To switch back to the normal mode, press Ctrl+Shift once more. You can also use this menu to turn off tool tips.
Shift the view to the next or previous Folder through the View menu. Specify the Folders you wish to visit with the Next and Previous selections through the Folder Preferences window. Go directly to a folder through the Go to Folder option.
Entity Status
Click Entity Status to open the Entity Status window. Click a DX call or Spotter call to show the status for the respective entity. (Single-click Call sign Lookup must be enabled in Spots settings.)
Hold
Pause the processing of incoming spots with the Hold button. During times of intense spot activity, Hold will allow you to explore the spot list without interference. Hold is also engaged during CW transmissions so that CommCat can devote full attention to code timing.
Rules: Spot Dupes
Incoming spots are tested against a duplication filter and Notify Rules you have defined. Open the Spot Dupe Rules or Notify Rules from the Rules toolbar button.
The duplication filter removes incoming spots that are similar to existing spots from further processing. This filter reduces the processing resources required by subsequent Notify Rule processing, which can be substantial when there are many spots arriving.
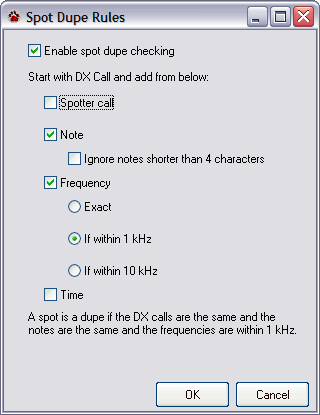
Turn on the filter by placing a check in the Enable check box. As you add filter options in the Spot Dupe Rules window, the filter description is shown in the sentence at the bottom of the window. An option without a check is not used as part of the duplication test. For example, if you don't use Spotter call, Spotter call is not used for the duplication check. Similar spots from different spotters will be identified as duplicates without the Spotter call option.
Rules: Spot Action
Notify Rules consists of one or more conditions which specify the test and one or more actions which determine the response to incoming spots. You can define as many rules with conditions and actions as you wish. Several sample rules are included with CommCat. You can use these rules, modify them, or delete them.
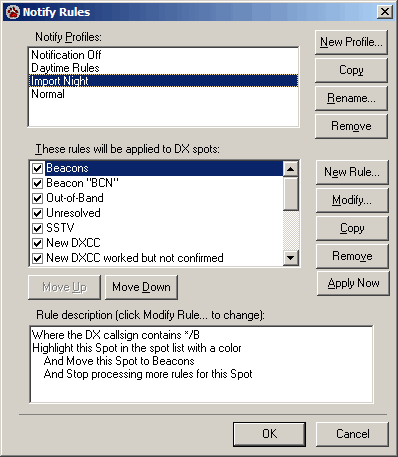
Notify Rules are organized into Notify Profiles. Each Profile holds a set of rules you can use for a special purpose. For example, you may have different Profiles for contests, chasing CW DX, or different Profiles for day and night use. Two Profiles are provided with CommCat: Notification Off, and Normal. Notification Off, used to turn off rule processing, cannot be deleted. Normal is provided with several sample rules you can use to study how rules are made. The Profile selected in the Notify Profiles list is the active Profile. The name of this Profile is shown in the caption bar at the top of the DX Spot Manager window.
The Rules associated with the selected Profile are shown in the list below the Notify Profiles list. You can add, remove, or modify the rules in this list.
Rules are processed in the order they appear in Rules list. Rules can be disabled by clicking their check boxes to remove the checks. They can also be moved in the list (and thereby their processing order) by clicking the Move Up or Move Down buttons.
Creating a New Rule
•Click Rules to open the Notify Rules window.
•Click the Profile you wish to use, or click New Profile.. to add a new Profile.
•Click New Rule... to open the New Notify Rule window.
•Select and check the Conditions and Actions you wish to apply for this rule.
•Click the underlined words in each Condition and Action in the Rule Description box to specify the parameters for each item.
•Name the rule and click OK to close the New Notify Rule window.
•Test the new rule by clicking Apply Now.
All checked rules are tested including the new rule. If you wish to test only the new rule, temporarily disable all other rules by unchecking them. Note that all spots are marked as "tested" once they have been added to the spot list. Apply All "untests" them so they can be tested again.
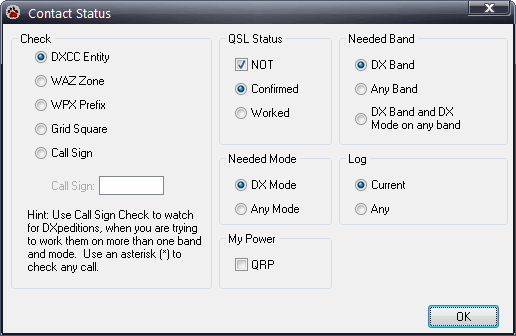
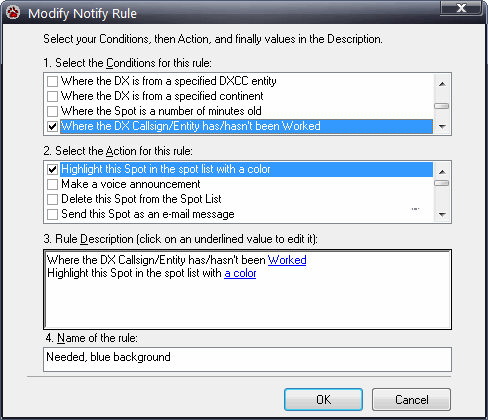
The Contact Status condition window below shows how you may wish to filter spots based on whether or not you need a particular entity. The Check DXCC Entity option is selected so the DX spot's entity will be used in the test. We want to be notified of any spots from an entity we haven't worked in any log. We will only be notified if we haven't worked this entity on the current (DX) band and current (DX) mode. In other words, if you need P5/4L4FN on 15 RTTY, you will be notified when he is on that band and mode even if we have already worked him on 15 SSB. If you want to be notified only when you need him QRP, check the My Power QRP box. The DXpedition box is checked so the condition also requires that the DX be mentioned in this week's ARRL DX Bulletin (this option is available with CommCat Live).
Modifying an Existing Rule
Existing rules can be modified to make changes in the Conditions or Actions associated with that rule. For example, you may wish to change the frequency limits or background color for a rule.
•From the DX Spot Manager window, click Rules to open the Notify Rules window.
•Select the Profile and then the Rule you wish to modify.
•Click Modify... to open the Modify Rule window.
•Select or deselect any Conditions and Actions you wish to add or remove from the rule.
•Click the underlined words in each Condition and Action in the Rule Description box to specify or change the details for each item.
•Change the rule Name if you wish and click OK to close the window.
•Test the modified rule by clicking Apply Now.
Copy an Existing Rule
Use Copy to create a new rule identical to an existing rule. All Conditions and Actions are copied into the new rule, and a new name is assigned. Follow the steps above to Modify an Existing Rule to make any necessary changes.
Removing an Existing Rule from the Rule List
Select the rule you wish to remove from the list and click Remove. This permanently removes the rule from the rule list. Note that you can temporarily disable an existing rule in the rule list by unchecking it if you wish to keep it for later use.
Exporting and Importing Profiles
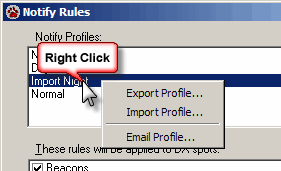
Right-click over the Notify Profile list to open the Profile Export/Import menu. Profiles are saved in compressed (Zip) files which contain all Rules for the Profile and any external audio files that have been used with a Rule. Profiles are imported into CommCat directly from the compressed file--it is not necessary to unzip a compressed Profile. If a Rule in the imported Profile uses a folder that has not been created in your DX Spot Manager, a new folder is created.
To e-mail a Profile to another CommCat user, choose the E-mail Profile option in the Profile menu. CommCat Zips the selected Profile along with any audio files, and attaches the zipped file to an e-mail message. When an e-mail is received with a Profile attachment, save the file in the CommCat Profile folder. Import the Profile into CommCat by using the Import option on the Profile menu.
Rule Conditions
CommCat Condition |
Search Details |
|---|---|
Where the DX Call contains specified characters |
Look for one or more characters in the DX Call. See Text Search, below, for additional information on text searches. |
Where the DX frequency is in a specified range |
Define the lower and upper frequency for processing this spot. |
Where the Spot Note contains specified characters |
Look for one or more characters in the Note field. See Text Search, below. |
Where the Spot Time is in a specified range |
Process this spot only if it is received in a specified time range. |
Where the Spotter call sign contains specified characters |
Look for one or more characters in the From call. See Text Search, below. |
Where the Spot is from a specified source |
Perform specified action when the source is from the Web, Telnet, Packet, or Local. |
Where the DX is from a specified DXCC entity |
Look for DX from specific DXCC entities (countries). The entity DX Reference number is used rather than the entity name. |
Where the DX is from a specified continent |
Look for DX from specific continents. |
Where the Spot is a number of minutes old |
Perform action at specified time intervals after the spot has been received. You can use this rule in phases to paint spots in different colors depending on the elapsed time. Be sure to place rules with longer elapsed times later in the rule list. |
Where the DX Call sign/Entity hasn't been worked/confirmed |
Identify spots for specific call signs, or DXCC Entities, Zones, Grid Squares, or Prefixes that have not been worked, or worked but not confirmed, in the current log or any log, using the current DX mode or any mode, or on the DX spot band or any band. If an entity is ambiguous (i.e., VP8), be sure to update the Entity data using the Entity Editor by adding the call. If you do not update the Entity data, the DX Spot Manager will probably show an incorrect entity for a known spot, and will not correctly identify worked entities. If you check DXCC Entity, NOT Worked, DX Band, and DX Mode, CommCat will find all spots for entities you haven't worked using the current DX band and mode. The options DX Band and DX Mode on any Band are useful to identify spots that will give you an all-time new band and mode for that entity. The call sign option, useful for working DXpeditions, provides a way to watch for spots on bands and modes on which you haven't worked a particular station. If you enter an asterisk in the call sign field, CommCat paints all spots that haven't been worked on the DX band. This is useful for casual contesting. (Be sure to use a new log for the present contest.) Place a check in the DXpedition check box to include spots where the call was listed in the most recent ARRL DX Bulletin (CommCat Live only). Place a check in the LoTW to include spots that are listed in the LoTW database (those stations known to be using LoTW). If you wish to limit this rule to spots needed while you are operating QRP, check the My Power option. |
Where the DX is using a specified mode |
Select Phone, CW, or RTTY/PSK as a condition for spots. The mode is determined from the spot frequency using the CommCat Ham Band Plan. This condition is useful if you want to exclude spots by mode from the spot list, or separate them into their own folders. |
Where the Spotter is from a specified continent |
Use this condition to accept or reject spots originating from specified continents. You may wish to use only spots originating from your continent. |
Where the DX is on a specified band |
Set up rules for specific bands with this condition. |
Where the Spotter is closer or further in miles/km than a specified distance |
Sometimes it is useful to set up rules for spots originating within a specified distance from your QTH. CommCat uses miles or kilometers depending on the program settings for distance units. This condition looks up the location of the station that submitted the spot in the Spot Distance database kept by CommCat. The distance to the spotter is shown in the Spotter Dist column. CommCat checks the database for a spotter call. If it isn't found, the call is added to the database. If it is found but the distance hasn't been added to the database, a ? is added to the beginning of the From call. When the distance has been entered, the From call is shown without a ?. See the Spotter Distance topic in the Maintenance section of Help for more information. The Spotter Lookup On option must be checked in the Spotter Distance window to have this Condition work. |
Rule Actions
CommCat Action |
What Happens |
|---|---|
Highlight this Spot in the Spot List with a color |
Accents the spot with a choice of foreground and/or background colors. The background color also establishes the color of the spot when displayed in the Spectrum Analyzer, Band Spotter, and Great Circle Map windows. |
Make a voice announcement |
Announce the call, frequency, and sound alert tone or play any external WAV file, or any combination, through your computer's audio card. Display an Alert popup window with a list of needed spots. CommCat processes spots in blocks. Tone and external WAV announcements are not repeated in a block when it is triggered by more than one spot. If you are using CommCat Mobile with VoIP, place a check in the Destination VoIP box to have CommCat call. This option is particularly useful when you include the Tune Rig action with the same Rule. |
Delete this Spot from the Spot List |
Move this spot to the Deleted Spots folder. |
Send this Spot as an e-mail message (Use with Caution!) |
Send this spot to the e-mail address distribution list specified in the E-mail tab of the File, Settings, Station window. Since this feature sends an email each time a spot meets the conditions for this Rule, many, many email messages can be sent if you don't carefully design the Rule. It is entirely possible to send 3-4 email messages a minute, especially if you are using a Telnet cluster for spots. |
Send this spot to my iPhone |
Send DX Push Notifications to your iPhone, iPod, iPad and Apple Watch (available with CommCat Mobile 2.5 or later) |
Tune Rig to the Spot frequency |
Self explanatory |
Forward this Spot to a selected destination |
Forward this spot to the Web Cluster or Packet Cluster. Special care must be taken when using this action to prevent spots from circulating. |
Make this Spot sticky |
Retain this spot indefinitely. |
Move this Spot to a specified folder |
Move the spot from the Inbox to a specified folder. |
Copy this Spot to a specified folder |
Copy the spot from the Inbox to a specified folder, leaving a copy of the spot in the Inbox. The spot copies are ignored in subsequent Rule processing. |
Stop processing more rules for this Spot |
Do not process any more rules for this spot. |
Move this Spot to end of list |
"Age" this spot. |
Move this spot to the DX Tracker window |
Create a spot marker on the DX Tracker window. The DX Tracker window must be open for this Action to work. |
Give this spot a priority level |
Assign a priority level of 0 to 10. |
Repaint the entire spot list |
Refreshes the spot list color scheme to repaint old spots whose status may have changed since they were originally painted. |
Text Search
Three CommCat Conditions in the table above provide for text searches in incoming spot announcements. The DX Call, Notes, and From Call can be included in Condition text searches. The following rules apply:
•Case is ignored. Text searches are case independent.
•The number sign (#) is a special character that can be used to specify a single digit. Any digit from 0 to 9 will be recognized. For example, W#A will find W6A and W1A. Only one # can be used in a condition. #D#C (when trying to find 3D1C) violates this rule.
•The asterisk (*) is a wild card which can be used alone or with the number sign. The asterisk can be used at the beginning of a call or at the end. *B* will find all calls that contain the letter B. WB6HQF and BV4US will be found. *BAC will find all calls that end with the letters BAC. VE* will find all calls that start with the letters VE. P5* will find P51AB but not VP5E. *P5 will find both.
•If no asterisks are included, the search is exact. VP5E will find VP5E and not VP5EC.
Troubleshooting Rules
It is possible to build complex Profiles containing many Rules. You may find that some spots are not being processed or filtered consistent with what you desire. Several trouble shooting hints are provided below to help you determine the cause of a problem.
•Rules are processed in the order they are listed in the Notify Rules window. If you find that the spots are not being painted in a color you expect, make sure the order of the Rules makes sense. For example, if the first rule says, "Paint the spot red if I haven't worked him," and the second rule says, "Paint the spot blue if that entity hasn't been confirmed," you won't see any red spots. In this case, use the Move Up button to move rule 2 to the top of the rule list.
•To isolate a problem Rule, turn off all rules by removing the checks to the left of each Rule. Then walk through the Rule list, and use the Apply Now button to test each Rule independently of the others. You should be able to find the offending Rule and correct any problems.
Updating spot status after working and logging a needed spot
Once you have worked and logged a spot, CommCat refreshes the spot's status in the DX Spot Manager spot list the next time new spots arrive. For example, if a spot needed for a new entity is painted red in the spot list, it should no longer be red once you've logged it. The next time new spots arrive, the logged spot's status is updated to reflect its change.
History
Click History to display a menu of the last ten spots you have viewed. Click a spot in the menu to return to that frequency and set the Focus DX call to that call sign.
Web Spots
Refresh the spot list from the Internet Cluster. You must be connected to the Internet for this function to work.
Send Spot
Open the send spot dialog to send a spot.
Stop
Stop any Internet activity. Use this option if the Internet Cluster is not responding. Stop can also be used to stop a long string of voice announcements which are the result of a Rule.
Rotate S and Rotate L
Instruct the rotor to go to the indicated bearing, short or long path. This button is disabled when a valid rotor is not found for the current band. The operation of this control is different from other rotor controls in CommCat, which use the bearing to the Focus DX call as their basis. The DX Spot Manager Rotate control uses the bearing that is in the status panel, which isn't necessarily for the Focus DX call.
Stop (Rotation)
Stop rotor activity.
Right Mouse Menu
A number of menu selections are available on the DX Spot Manager right mouse menu. The menu is shown below.
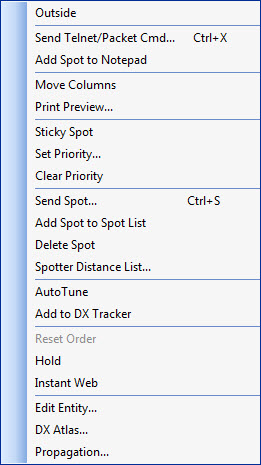
Outside
Convert the DX Spot Manager to the "outside" version that allows you to move the window away from the main CommCat window.
Send Telnet/Packet Cmd...
Opens a window which provides a way to send a command to a Telnet site or Packet Cluster. You must be connected to one or the other for this command to be functional.
Add Spot to Notepad
Copies the selected spot to the CommCat Notepad, if Notepad is open (Main CommCat menu bar, Tools, Accessories, Notepad).
Move Columns
Places the spot list grid column headers in the column move mode. Normally when you click a column header, the order of the spot list is set to that item. In the column move mode, clicking a header selects it and allows you to move it to another column position.
Print Preview...
Opens the print preview window displaying the spot list. You may then print the list if you wish.
Sticky Spot
Sets or clears the sticky spot status for that spot. When the sticky spot status is set for the selected spot, a check marks appears next to the label in the menu.
Set Priority...
Opens a window which provides a way for you to set the priority level of the selected spot.
Clear Priority
Sets the priority of the selected spot to 0.
Send Spot...
Opens a window which allows you to send a spot to a Telnet, Web, or Packet site. The destination is selected in the File, Settings, Spot window.
Add Spot to Spot List...
Opens a window which allows you to add a spot to the DX Spot Manager spot list. This spot is not sent to an outside destination.
Delete Spot
Remove the selected spot from the spot list and send it to the Deleted Spots folder.
Spotter Distance List
Open the Spotter Distance window to view and maintain the list of spotter calls.
AutoTune
Tune the current radio to the DX frequency reported in the selected spot.
Add to DX Tracker
Add the selected spot to the DX Tracker window. The DX Tracker window must be open for this option to be enabled.
Reset Order
Reset the order of the spots in the spot list to "as received". If this option is dim, the order is already reset
Hold
Temporarily stop all spot processing.
Instant Web
Create an Instant Web Page for the DX station reported by the selected spot.
Edit Entity...
Open the Entity Editor window for the entity of the DX reported in the selected spot.
DX Atlas...
Engage the DX Atlas window for selected spots. When the DX Focus call changes, DX Atlas opens showing the location of that DX. This function is turned on when there is a check next to the DX Atlas menu item. See the DX Atlas Help topic for more information about DX Atlas.
Propagation...
Opens the Propagation Prediction window to show the approximate path conditions between you and the selected DX spot. This option requires the installation of a freeware program. See the Propagation Prediction Help topic for more information about HamCAP from VE3NEA.
Special Keys
A number of special key assignments are available in CommCat for navigating within the DX Spot Manager spot list. The key assignments are described below. The functions work within any DX Spot Manager folder. For example, if you have defined a rule that passes all 20 meter spots to a folder, and then view that folder, the special keys work within that folder.
Key |
Function |
|---|---|
Mouse wheel |
Scroll through the spot list |
PgUp |
Move spot list up one page at a time |
PgDn |
Move spot list down one page at a time |
Up Arrow |
Move to next higher spot |
Dn Arrow |
Move to next lower spot |
Alt+Home |
Move to top of spot list |
Alt+End |
Move to bottom of spot list |
Space |
Tune to selected spot |
Ctrl+L |
Shift view to next Spot List Folder |
Ctrl+Shift+L |
Shift view to previous Spot List Folder |
Ctrl+X |
Send Telnet/Packet command |
Ctrl+Y |
Open Folder Selection window |
Ctrl+Z |
Return to last spot |
Ctrl+S |
Send Spot announcement (also available in other windows) |
Printing the Contents of the DX Spot List
To prepare a printed copy of the DX Spot List, choose Print Preview from the File Menu, or right-click over the spot grid and choose Print Preview.
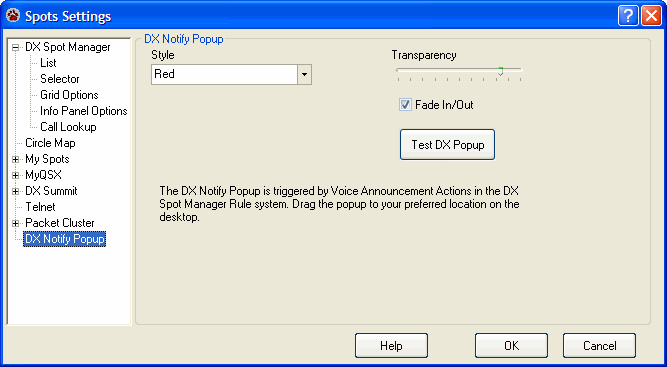
DX Alert Notification Popup
Sometimes you are busy on a computer project, but want CommCat to run in the background to alert you when a spot of interest is announced. The DX Alert Popup provides a list of desired spots that appears on top of all other applications on your desktop.

The popup stays for a few seconds, then disappears. To keep it from disappearing before you've had a chance to review it, position the mouse pointer over the popup. Click the popup to bring CommCat forward from behind any other applications.
Drag the top edge of the popup window to move the popup to the location you prefer on your desktop.
You can change the appearance of the popup in the Spots Settings window. Options include settings for Style, transparency (how much of the background behind the popup shows through), and whether it fades in and out when opening and closing.
To set up what will trigger the DX Alert Notification popup, use the DX Spot Manager Rule system. Create a condition you want to be met to create a Notification. For example, you may want to display the popup for spots from entities that have not been confirmed in your log. Next add the Action 'Make a Voice Announcement.' Put a check in the Alert and Popup options. If you wish a tone to be played to announce the Alert, put a check in the Tone option.