See also: Log Report, Log Maintenance, Quick Log
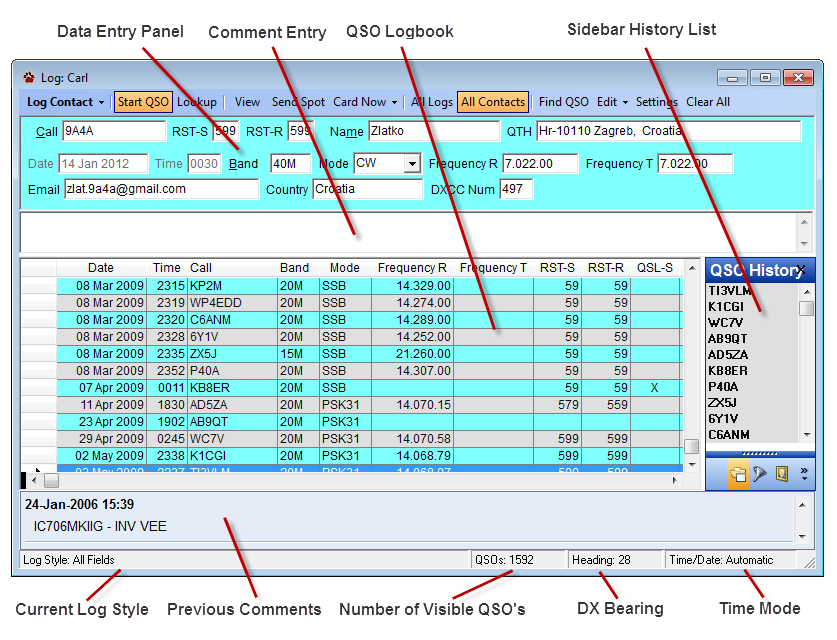
The CommCat Advanced Log Window is the main window for entering and maintaining all information for contacts you have made. See the Quick Log Help topic for a streamlined version of this window.
Overview
The CommCat Advanced Log window provides a way for you to log, edit, and keep track of contacts you have made with other stations. There are no practical limits to the number of contacts or logs you can maintain. Logs can be designed to suit your specific needs, showing the data fields you have selected in any order you wish. Logs can be kept for different operators, various bands, or contests in which you participate.
Logbooks are kept in Master Logs. Master Logs are used to maintain completely independent logbooks. You can have as many Master Logs as you wish. Each Master Log contains logbooks, logbook lists, and award records.
The log window shows all contacts in your log, or the contact history for a specified station. For example, if you have worked W1AW on 4 occasions and have entered the contact details in a single log, four entries will appear in that log. If you entered the W1AW contacts in several logs, you can view contacts from all logs.
The Log window contains the call of the station you have worked, his/her name and location, and the log details. An optional Comment field at the bottom of the data entry panel window provides a place to enter miscellaneous details about the contact.
QSO Start Time
The QSO Start Time can be set when you log the contact, or when you first make contact (but before you have logged the contact). The first case is used most often if you are making quick contacts, one after another. The second case is used if you are making long contacts. In the latter case, the End Time is set when you log the contact. Additional details are provided below.
Starting a new log entry
CommCat provides a number of ways to enter a new contact in the log. Here are a few:
1. Open the Log window, select the contents of the Call field, then type the new call.
2. Click the Clear All button on the Log toolbar, then type the new call in the Call field.
3. Double-click a call in the DX Spot Manager or Band Spotter window. The call is entered automatically.
4. When the Advanced Log window has focus, press ESC, or Alt+N.
Checking for previous contacts
Once you have entered a call in the Call field using one of the techniques above, click Lookup to have CommCat check the log using a filter to see if you have had any previous contacts with that station. Other options are available for looking up, see below. The details of previous contacts are shown in the detail grid. CommCat also looks up the contact in the call book you have selected to complete additional information.
Additional filter options are provided with the space bar.
Space |
Find all contacts matching the characters in the Call field and look up call in Callbook. The call becomes for Focus Call for CommCat. |
Shift + Space |
Find all contacts for the entity associated with the characters entered in the Call field. The Focus Call does not change. |
Ctrl + Space |
Find all contacts matching the characters in the Call field, plus the band and mode fields. The Focus Call does not change. |
Alt + Space |
Find all contacts for the entity associated with the characters entered in the Call field, plus the band and mode fields. The Focus Call does not change. |
Contact details are not permanently recorded in the log until the QSO appears in the QSO log. If you enter another call in the Call field or close the Log window without logging a contact, the call and any other information you have entered is erased.
If you have enabled Dupe Checking, contacts meeting the conditions you have set are shown with a light red bar. See Dupe, below, for further information on setting the conditions to check for a duplicate contact.
Logging a New Contact
Once you have decided to log a contact, CommCat provides several ways to complete the details and record the information in the current log.
1. After entering the call for the new contact, press Enter. (The Enter key can be reassigned to look up the details for that station rather than log the contact. This choice is made in the File, Settings, Station, Log window.)
2. Click Log Contact or use Alt+L
When the contact is logged, CommCat enters the current time as the start time for the QSO unless you have used the Start Now option.
If you wish to set the start time before logging the contact, press Ctrl + Enter or click Start Now to freeze the time. This option is useful if you have started a QSO, but want to take your time to fill additional data fields before logging the QSO. When you log the contact, the QSO End Time is added.
Editing a Contact
Changes can be made to contacts in your log to correct existing data, or to add new data. Click Edit in the Advanced Log menu bar or double-click any row in the Advanced Log Detail Grid to open the Edit QSO window for that contact. Make any changes you wish to the data, then click OK to accept the changes and close the Edit QSO window.
With the Edit QSO window open, click the Next QSO or Previous QSO buttons to move to another contact. As you move from one contact to another, the current field in the Edit QSO window remains selected so you can easily modify a given field for more than one contact. Click Lookup to fill bank fields from the call book source you have specified. Click Delete QSO to remove the displayed contact from your log. Make the window slightly wider if the Delete QSO button does not show.
Resize the window to suit your preferences. The height and width of the window are retained for the next time you open the Edit QSO window.
The DXCC Number is the value that CommCat uses to determine the associated entity (country) for all contacts. If it is necessary to edit the DXCC number, open the DXCC Number List by clicking DXCC Num in the toolbar. With the DXCC Number List you can find the right number for this contact. When you move from the current log record by closing the Edit QSO window, or by clicking Next QSO or Previous QSO, CommCat checks the Country, Continent, CQ Zone, and ITU Zone against the DXCC Number. If it finds a discrepancy, CommCat asks if you want to correct the data. Click Yes to modify the data so it is consistent with the DXCC Number.
To add the mailing address for a QSL card, click the QSL Address field. Click the down arrow button on the right side of the field to open a text box for the complete address. See the Label Report topic for additional information on printing address labels.
Editing Multiple Contacts
The CommCat Logbook Editor provides a way to edit many contacts at once. You can change data in the contacts in the current view, or selected contacts. Open the Logbook Editor by clicking the Edit down arrow and choosing Logbook.
Enter data in any fields you wish to modify. If you wish to delete existing data, use angle bracket characters (<>). To limit the changes to selected contacts, place a check in the Use Selected QSO's check box.
Use the Callbook Lookup option to have CommCat use the call book source to fill fields for every edited QSO. The lookup fills the following fields when corresponding data is available from your call book source:
1. Name (full or first, depending on your log settings).
2. QTH
3. e-mail
4. URL
5. County
6. State
7. Country
8. Continent
9. QSL address
10. QSL manager
11. Grid square
If you wish to fill a field in the above list with fresh info you can delete the existing contents using <> and then run lookup. Any existing info in a field will not be changed. Be sure to back up your log before running this feature in case the results are not what you want.
When you are ready to apply the changes, click Modify Log Data. The current QSL being edited is reported in status bar at the bottom of the window.
If you wish to clear all data you have entered to start over, click Clear All Fields.
Selecting Contacts
You can select one or many contacts in the Advanced Log contact list. To select a contact, click the gray column on the far left. The selected contact is displayed with a dark blue background.
Multiple contacts can be selected in the log to perform operations on a group of log records. For example, if you wish to copy a portion of your log to paste it is a second log, select the contacts you wish to be included, then press Ctrl+C to copy them.
To select a range of contacts, click the selector column on the far left of the detail grid for the first contact you wish to include. Find the last contact you wish to be included, and use Shift + Click.
To add or remove individual contacts to the selection, click the corresponding selector column position using Ctrl + Click. To remove a selected contact, use Ctrl + Click to remove the dark blue highlighting.
To select all contacts in the current log view, select a contact then press Ctrl + A.
Note that clicking a column other than the selector column does not add that contact to the selection--you must click the selector column. Clicking a column other than the left column removes all selections.
Use the right mouse menu option Show Only Selected to hide all but the selected contacts from the view.
Operations with selected contacts
What can be done |
How to do it |
|---|---|
Delete contacts |
Press Delete |
Copy contacts to clipboard |
Ctrl+C |
Paste contacts |
Ctrl+V |
Cut contacts |
Ctrl+X |
QSL |
Click QSL Now on Advanced Log menu bar |
eQSL |
Click eQSL Send on right-mouse menu, or down-arrow on QSL Now menu |
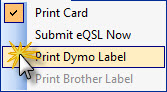
Print Dymo or Brother labels |
Click down arrow on QSL Now menu and choose Print Dymo (Brother) Label. Sort the contacts by call (click the call header) to combine multiple contacts on one label. |
Edit multiple contacts |
Click down-arrow on the Edit menu and select Logbook. Put a check in the Use Selected QSO's option. |
E-mail selected contacts |
Right-click over the QSO grid and select e-mail Selected Contacts to include the information for the selected contacts in an e-mail message. An e-mail message is prepared and opened so you can edit it, accept or change the e-mail address, and send the message. (This function requires that you have a MAPI enabled e-mail client, such as Outlook Express, installed on your computer.) |
Use for new log |
Copy contacts (or use cut if you want to move the contacts), then paste into new log, or use File, Save As window to save selected contacts. |
Print as data report |
Go to Reports, Log and use "Selected Contacts" as filter. |
Print QSL report labels |
Go to Reports, QSL Labels, and use "Selected Contacts" as filter |
Deleting Contacts
You can delete contacts with the Delete key or by using the Edit QSO window. Once contacts are deleted there is no way to recover them other than by restoring your log from a backup. You can delete a single contact, selected contacts, or all contacts currently listed in the Advanced Log.
Delete key
Select a contact or multiple contacts by clicking the selector column on the left side of the QSO list. Press Delete to remove the selected contacts. CommCat reports the number of contacts you are about to delete and asks permission before proceeding.
Edit QSO window
To remove a contact from the log, double-click the QSO Details row containing the contact you wish to delete to open the Edit QSO window. Click Delete QSO in the menu bar. CommCat asks you to confirm that you want to delete data. (This confirmation is not requested when you have told CommCat to not ask when you are about to delete information.) Click OK to close the Edit QSO window.
It may be necessary to widen the Edit QSO window slightly to see the Delete QSO button.
You can also click the Edit button at the top of the Log window and proceed as above.
If you wish to delete all contacts presently displayed in the Advanced Log, open the Delete menu by clicking the down arrow on the right side of the Delete button on the Edit QSO toolbar. Click Delete All to delete all displayed contacts from the log. CommCat asks for confirmation before proceeding. Once all contacts are deleted, the Edit QSO window closes.
To delete selected contacts from the Log, select the contacts you wish to delete as described above. Choose Delete Selected in the Delete QSO menu to permanently remove the contacts.
Preparing a QSL card
CommCat prepares a QSL card for a selected contact when you click QSL Now on the Log toolbar. Once the card is created, you can print it. If you select more than one card, cards for the entire selection are printed.
eQSL
eQSL is an electronic QSL service on the Internet. To learn more about eQSL, visit http://www.eqsl.cc. Your eQSL user name (usually your call) and password are entered in the CommCat File, Settings, Station, eQSL window. When these items have been entered and you select a QSO, right click over the detail grid and choose eQSL Send to submit the selected QSO to your eQSL Inbox. (You must be connected to the Internet to use this feature.) You can also click the down arrow next to the QSL Now menu item to submit the contact. The contact is submitted automatically...it is not necessary to log on to eQSL.cc.
If you wish to submit more than one contact, create an ADIF file using the File, Export window and upload it to eQSL.
CommCat will not submit contacts that have an unsupported band such as SAT.
eQSL cards you receive can be saved in the CommCat log as described below. Click eQSL Received in the right mouse menu to enter eQSL in the contact's QSL Received Via field.
Print Dymo Labels
Dymo labels can be printed from the Advanced Log window to confirm contacts. Report grids can be prepared for a single QSO, multiple QSO's with a single station, or for QSO's with multiple stations. A sample report label is provided with CommCat. This label is designed to hold up to three contacts with the same station. The sample QSL label can be modified or you can design entirely new label templates with the Dymo designer software.
Important: Dymo labels are printed with thermal technology that can fade over time when exposed to light and/or heat. The labels are especially sensitive to sunlight and fluorescent lighting.
To print Dymo labels, install the Dymo software provided with the printer. CommCat then recognizes that a Dymo printer is available. Select the Dymo printer option on the Report Settings, Label window.
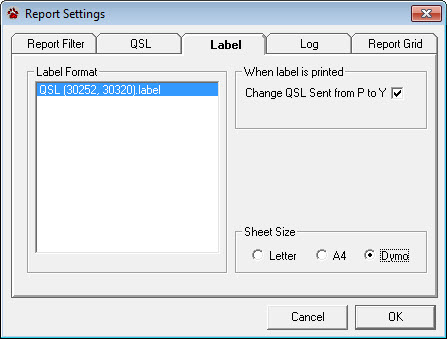
Select the QSL template from the Label Format list and check the option for P to Y management of printed labels if you are using this system. The sample Dymo label is located in My Documents>COMMSOFT>CommCat>QSL.
Select the contacts for which you wish to print labels, then choose Print Dymo Label from the QSL Now menu.
CommCat prints labels in the order they are listed in the log. If you are printing labels from a number of stations, set the log to call sign order by clicking the Call column header. Doing so will reduce the number of labels required since up to 3 contacts can fit on one label.
If you wish to design your own label template, use the Designer software provided with the Dymo printer. Open an existing label, or create a new one. Click the Designer button on the Dymo Label window to allow objects to be modified or created.
Create text objects to hold text that will print on each label, or empty text objects to hold QSO data. Use Edit, Object Properties, and Edit, Object Settings to set up the objects. An object must be selected before these options are enabled in the menu. I've found that it is best to disable "Shrink to fit" for objects that will be filled by CommCat.
In the Dymo Label Text Settings window, check the option Function as Variable Text Object so the label printer will expect text from CommCat.
Rename the text objects according to the following rules:
Text Object Name |
Details |
|---|---|
CALL |
Station's call sign, printed once per label. |
CALLn |
Station's call sign, printed once per QSO. |
DATEn |
QSO Date, printed once per QSO. |
UTCn |
QSO Time, printed once per QSO. |
BANDn |
QSO Band, printed once per QSO. |
2WAYn |
QSO Mode, printed once per QSO. |
RSTn |
Station's RST signal report, printed once per QSO. |
Replace n with the QSO line number starting with 1.
CommCat checks any label you have specified to make sure it will contain QSO data. If it doesn't find a text object named "DATE", a bad label format is reported.
Print Brother Labels
Brother labels can be printed from the Advanced Log window to confirm contacts. Report grids can be prepared for a single QSO, multiple QSO's with a single station, or for QSO's with multiple stations. A sample Brother report label is provided with CommCat. This label is designed to hold up to three contacts with the same station. The sample QSL label can be modified or you can design entirely new label templates with the Brother designer software. The sample Brother label is located in My Documents>COMMSOFT>CommCat>QSL.
Worked Before (WB4) Window
The WB4 window shows a list of prior contacts with the current station. It is similar to the Advanced Log Grid when All Contacts is not selected. It is much faster than the Advanced Log view. Open the WB4 window from the Tools>Logbook sub menu.
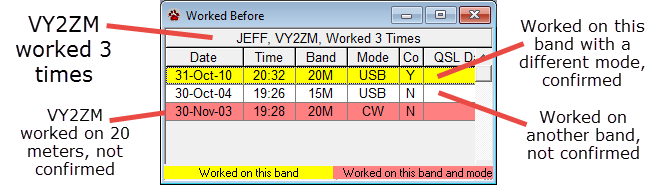
The background color of each row tells whether that station has been worked on the current band and mode (red), on the current band but a different mode (yellow), or worked on a different band.
Double-click any row in the list to show that contact in the Advanced Log QSO grid. From there you can edit the contact by double-clicking the selection column (far left) next to that QSO.
Advanced Log Sidebar
The Advanced Log Sidebar is similar to the sidebar in the DX Spot Manager. To show the sidebar, click View in the Advanced Log menu, then Sidebar. To hide the sidebar, click the X in the upper right corner of the sidebar, or click View, Sidebar. The Sidebar can be converted to an independent window by using the Attached Sidebar option in File>Settings>Station>Log>Lookup Options/
The sidebar contains a number of panels that help filter your log, display qso history, or serve as an operating aid. To display a panel, click an icon at the bottom of the sidebar. You can also customize what icons are shown by clicking the Customize button on the right side of the icon bar.
QSO History
The QSO History panel has two modes: recent contacts, and super check partial (SCP). Click the Super Check Partial button at the top of the QSO History panel to switch back and forth between modes. When the panel is in the SCP mode, the button is highlighted.
The recent contact mode shows the 100 most recent contacts in your log. The most recent contact is at the top of the list. Click a call in the list to see your QSO's with that call.
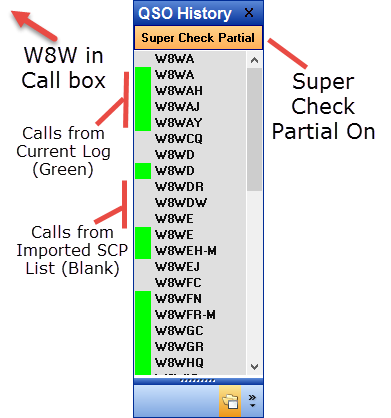
The SCP mode shows matching calls from your log and other sources as you type a call in the Advanced Log Call box. Up to 100 calls are shown. Green icons tell you the call source is from the current log. In addition to your own log, the SCP mode looks up calls in special imported databases. The most common SCP databases can be found here:
http://www.supercheckpartial.com/
All the files on the site having an extension .scp can be used. Any number of lists can be imported into your CommCat Master log, each into its own logbook. By using the "All Logs" selection in File>Settings>Station>Log>All Logs you determine which list or lists to use. For example, if you wished to try out the ARRL Sweepstakes contest, you could create a new logbook for SS, and use the masusve.scp file that contains VE and W calls. In the All Logs setting, you would identify SS and the masusve log. You will be able to instantly see if you have worked that station before in the contest, and on what bands and modes.
To import a SCP file use the following steps:
1.Create a new Log in CommCat using File>New Log... For the SS example, you might name it SCP USVE.
2.In File>Import, specify the SCP Master Format.
3.Locate the file you want to import.
4.In the Add to Logbook list, specify SCP USVE. Important: Use the newly created logbook or you will add the SCP calls to an existing log.
5.Click the Import button
To delete an SCP logbook, open that log with File>Open Log, then use File>Maintenance>Delete>Current Log.
The icons to the left of calls from your log show the the source of that call. The icons are green for the current log and blank for SCP calls.
When typing calls in the Advanced Log Call box you can use ? to denote unknown characters. For example, W?HN shows all calls starting with W, second character unknown, and HN. W0HNI would appear in the list. Entering W??H would allow W2AH and W6ZHO to show in the list.
You can also use the asterisk (*) character as a wild card. Typing *OO will show all calls with OO. Typing *O?O will show all calls with two O characters separated by any other character. For example, *O?O will show CO2OQ.
From Stu, K6TU, on the Super Check Partial web site: "Super Check Partial is a feature that K1EA first introduced in his CT logging software. However, it is now supported by all the major contest logging programs. It enables the use of the database to extend the list of calls that appear in the check partial call window. Used correctly, it can help you more quickly pull a call out of the QRM. Used incorrectly, e.g. to guess calls, it can result in stupid mistakes and significant score reductions. Caveat emptor!"
Filter
The Filter panel provides a way to display a subset of your log. This is useful if you want to create a special report, or print QSL cards for specific contacts. You can filter contacts using Band, Mode and Dates. The filters are cumulative, so you can show contacts on 20M, CW, for Oct 5, 2008.
Click a Band button to show all contacts for that band. Use Ctrl+Click to include more than one band.
Click a Mode button to narrow the list to a mode, SSB, Digital, or CW. Use Ctrl+Click to include more than one mode.
The Date panel shows a calendar that is marked showing your contacts. Click a date to show all contacts for that date. Use Shift+Click to select a second date to show a date range.
To clear all filters, click Clear All on the Band panel.
Image
See below.
QSO Timer, Notes, Unit Converter
See the QSO Timer, Notes and Unit Converter descriptions in the DX Spot Manager topic. Drag a QSO from the log, or a spot from the DX Spot Manager, to include that info in the Notes.
Images and Photos
The CommCat log can store one image per QSO. As you scroll through your log, stored images appear in the sidebar image panel.
|
Important: Photos can consume significant storage space causing your log to become quite large.
Adding Images to the Log
Images are added to the log by using drag-and-drop or by pasting from the clipboard. QSL card images from eQSL or photos on QRZ.com are examples of images that can be easily added to a QSO through drag-and-drop. Open the Instant Web Page and display the page for the current DX Focus station. If an image is available on QRZ.com, a hot link is provided on the Instant Web Page. Click the link and then drag the photo to the Advanced Log Image sidebar pane. It is also possible to drag images from the Info panel in the DX Spot Manager.
A link to eQSL is provided in the Links tab on the Instant Web Page. If you use the eQSL service you can display eQSL cards for stations you have worked. Drag the eQSL card image to the Advanced Log preview pane.
When an image is added to a QSO, the Photo field for that QSO is checked. Click the Photo header in the detail grid to group together all QSO's that have a photo.
Since images are stored in the CommCat log they are backed up when you back up the log. The saving of images also affects the size of the log.
Multiple Logs
The name of the current logbook is shown in the CommCat title bar in parenthesis. For example, if you are currently using a log named "Main" in the "W6HN" Master Log, the CommCat title bar will show CommCat (W6HN: Main). If you are displaying all logs, new entries will be added to the current log shown in the title bar. You may open an existing log or create a new log at any time. To open an existing log, choose Open Log from the CommCat File menu. The Open Log dialog box opens, providing a list of existing logs. Double-click the name of the log you wish to open.
Searching for a Previous Contact
The simplest way to see if you have already had a contact with a station is to enter the station's call sign in the Call box, then press the space bar as described above. All contacts for that station are filtered and displayed in the log detail grid.
You can also search using a partial call. For example, to find all contacts with Canadian stations whose calls start with VE3, enter VE3* (add a trailing asterisk) in the Call box and press the Space bar. The letters/numbers searched are at the beginning of the call. This quick search with VE3 will not find K2XYZ/VE3 (but will find VE3/K2XYZ). This search technique is not available if you have selected the Clear Data option when the QSO is logged (File, Settings, Station, Log).
If you wish a tone to be played when there is the possibility of a dupe, check the 'Sound alert when dupe' option in the File, Settings, Station, Log window. The tone comes from a file named ding.wav located in the CommCat Audio folder. You can substitute any wav file for this file, after renaming it ding.wav.
Find QSO window
The Find QSO window is shown below. This window provides a way to locate a call in your log by searching on call sign. Once found, several commonly edited fields can be modified. Log Search uses the current Log view. If you wish to search using all contacts in the current log, click All Contacts in the Log toolbar. If you wish to search in all logbooks, click All Logs.
To open the Find QSO window, click the Find QSO button on the Log window toolbar. The call sign of the selected log entry appears in the Find Call box. Change this call sign to reflect the call or part of a call you wish to find.
Click the radio button corresponding to how you want to search, using the Find Call text as the whole call, the first part of the call, or appearing anywhere in the call.
The following search options are provided:
|
Find |
Locates and selects the first QSO in the log meeting the search parameters. |
|
Next |
Locates and selects the next QSO in the log meeting the search parameters. |
|
All |
Finds and selects all QSO's meeting the search parameters |
As each QSO is found, it is selected in the detail log grid. Selected contacts can be used as a group when exporting a log, printing a log, or creating QSL cards or labels. You can also delete all selected contacts from a log.
As a search progresses the selection bar on the Log window detail grid moves to identify the contact matching the search conditions you have specified. If you are finding individual contacts (not All), you can edit the QSL Sent and QSL Received status for that contact. Click the Set P-N button to set the QSL Sent status to P(rint) and N(ot Received). Save the changes by clicking Save.
Advanced Find QSO
Click >> to open the Advanced Find QSO window.
The Advanced Find QSO window provides additional search options. These options allow you to search for QSO's after or before a given date, containing specified text in the Comment field, from a specified continent, using a specified mode or band, and QSL status. Once you have completed the additional search fields you wish to use, click Find to locate the first call that matches the conditions you have specified. Click Next to go to the next call that matches the conditions. To find and select all QSO's meeting the search parameters, click All.
The Advanced Find QSO window allows you to conduct multiple searches with different parameters each time. This ability permits you to select QSO's meeting a variety of conditions. For example, you can search for all RTTY and CW contacts on 20 and 15 meters, which don't include North American contacts. The results of each search can replace, add to, or subtract from previous searches. Use the list at the bottom of the window to choose which action you wish to use.
Click << to return to the normal view of the Find QSO window, and click Done to close the window.
When the Find QSO window closes and the search has resulted in one or more QSO's being selected, you are asked if you wish to view only the selected QSO's, or all QSO's. If you select All, the selected QSO's are highlighted in gray. You can modify the selection by using Ctrl+Click for unselected QSO's you wish to add, or selected QSO's you wish to remove. Once you are done, right-click over the detail grid and select View Selected from the menu to view only the selected contacts.
Updating QSL Status
CommCat supports paper QSL card, LoTW, and eQSL QSLing.
Paper QSL
As you send and receive QSL cards, one necessary chore is the updating of QSL status for contacts. The easiest way to update the QSL status for a contact is to locate the contact in your log, then choose a status update option from the right mouse menu.
The options include setting QSL-S and QSL-R to Y, QSL-S to P and QSL-R to Y, setting one or the other to Y, or setting the QSL-S status to P. A status of P signifies that this is a contact you wish to confirm either by a CommCat QSL card or by a label. When a corresponding card or label is printed, CommCat can convert 'P' to 'Y' for you. When you change QSL-S or QSL-R to Y, CommCat automatically enters today's date in the Date Sent field and/or Date Received field.
The DXCC Entity Status Window provides a quick way to view the QSL status for the entity of each QSO as you scroll through your log. Use the All Contacts selection on the Advanced Log toolbar to show all contacts. By watching the DXCC Entity Status window you can tell if a card should be sent for the selected QSO for DXCC purposes. To see all contacts for the selected call, return to the call view of the log by clicking All Contacts to disengage it.
Note that you can use any alpha or numeric character to specify QSL sent and QSL received status. However, CommCat uses 'Y' and 'N' to compute QSL status for awards. No entry (blank) in either field is interpreted as an 'N'.
eQSL
When you choose eQSL Send, the selected contact is submitted to the eQSL Inbox, and eQSL is added to the QSL Sent Via field in the CommCat log. When you receive an eQSL, select eQSL Received to add eQSL to the QSL Received Via field.
LoTW
CommCat treats QSL's received through the ARRL LoTW (Logbook of the World) system the same as paper QSL's. LoTW confirmations can currently be used for DXCC and WAS awards, and support for additional awards is planned. CommCat can import LoTW files from the ARRL, and export logged QSO's for upload to LoTW. For more information on importing and exporting LoTW data, see the Import and Export topics in the Log Maintenance section.
Imported LoTW confirmations change the QSL Received field for each confirmed contact to Y and add 'LoTW' to the QSL Received Via field. QSO's exported to LoTW have 'LoTW' added to the QSL Sent Via fields for each exported QSO.
See the Satellite Contacts information, below, when submitting satellite contacts to LoTW.
Manual Data Entry
If you are using CommCat without a radio, or wish to manually enter previous contacts that aren't in your log, CommCat provides a way to proceed. When in the manual data entry mode, the text in the data entry boxes is shown in red as a reminder. Enter the Receive Frequency to have CommCat use its band plan to complete the band, mode, and default signal reports for you.
To enter the manual data entry mode, click the down arrow next to the Log Contact button on the Advanced Log menu, choose Manual Entry from the right mouse menu, or check the Manual Entry check box in the File, Settings, Station, Log window. The manual mode is reset to Automatic when you restart CommCat.
Satellite Contacts
CommCat satellite contacts are identified by a satellite name entered for a contact. If you are involved in satellite operating, you can also use the CommCat manual logging selection and set the Band field contents to SAT by clicking Satellite Mode in the Advanced Log right mouse menu. When LoTW export finds a satellite name, it modifies the details of the LoTW submission to show the contact as a satellite QSO.
Tuning your rig to a logged frequency
Tune your radio to a frequency entered in a selected contact by choosing Tune from the right mouse menu.
Customizing the Log View
Contact Order
The log detail grid normally lists contacts in time/date order. The order can be changed by clicking the header of any column you wish to use to establish order. For example, to set the log to call sign order, click the header labeled Call. The new sort order is temporary. The next time you change the contents of the detail log grid, the order is reset to time/date. Click Call again to set the order to the opposite direction.
You can use cumulative sorts in the detail grid. For example, you can sort by country and then call. To do a cumulative sort, click the header of the first column you wish to use. Right-click over the column headers and then click OK on the message box that invites you to click a second header. Click the header you wish to use as the second sort.
The log detail grid also can be customized to suit your preferences. The order of fields can be changed, columns can be displayed or hidden, and the size of columns can be changed. The changes you make are applied to the current log style (see below).
Change column width
To change the width of a column, drag the line in the detail header separating the column from the next column to the right to adjust its width. For example, to make the Date column wider, drag the line to the right of the column labeled "Date".
Hide a column
Columns can be hidden using the Log Style Editor, or interactively. To hide a column interactively:
1.Right-click over the detail grid and choose Move Columns.
2.Click the header of the column you want to hide to select it.
3.Right-click over the detail grid and click Hide Column.
4.Right-click over the detail grid and click Move Columns to remove the check mark.
Unhide columns
Hidden columns can be unhidden in the Log Style Editor window checking the Grid check box for that item.
Moving columns
To change the position of a column in the detail grid:
1.Right-click over the detail grid and choose Move Columns.
2.Click the header of the column you want to move to select it.
3.Drag the column header to a new position.
4.Right-click over the detail grid and click Move Columns to remove the check mark.
The column order you establish is used for the Log Report and for the relative horizontal position of data boxes in the data entry panel.
QSO History
The QSO History list shows the 100 most recent contacts you have made. Click a call in the list to display contacts with that station in the QSO Detail Grid.
Moving Advanced Log Out of the CommCat Main Window
If you wish to move the Advanced Log window out of the Main CommCat window, check the Log option on the File, Settings, Program, Outside Window window. This option is useful if you want to display the Advanced Log window while using another program, or you have a dual monitor system.
Logbook Style selection
A log style template determines how the log window appears. It determines which data fields are displayed in a log, and the order and width of data columns. CommCat provides a standard log template. You can modify a style templates or create your own design. You may have different styles for participating in contests, chasing an award, or casual DX operation. When you switch from one template to another, log data is displayed or hidden depending on the template design. Click Edit Log Style to open the Log Style Editor window. Click Style to open a template. Remember that no data is added or lost in the underlying CommCat log when you change a template.
Log Styles
CommCat provides a great deal of flexibility in how the Log window is organized and what information is displayed. Using the Log Style Editor, the layout of the Advanced Log window can be customized for different awards, contests, and general operating. Each log has a log style assigned to it. The decision of what style to associate with a log is made when the logbook is created, but you can change the style of a log at any time. You may create as many log styles as you wish.
To open the Log Style Editor window, double-click the Log window Data Entry panel background or click Edit Log Style on the Log window toolbar.
Changing the Current Log Style
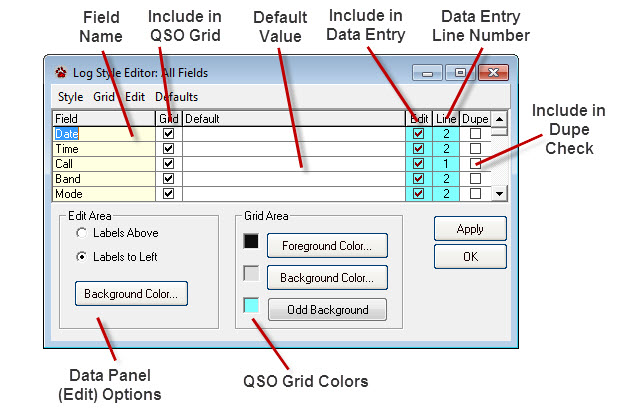
The Log Style Editor opens displaying the current log style. The columns included in the grid are as follows:
Column Name |
Description |
|---|---|
Field |
The names given to data fields. This name appears in the Data Entry Fields panel to the left or above their data boxes (an option that can be set). This item cannot be edited--the field names are fixed. |
Grid |
When checked, this field appears in the Detail Grid. Choose Show All Grid Fields from the Grid menu to initialize the grid to show all fields. Choose Hide All Grid Fields to remove them all. |
Default |
Add a default value (when the field is white) for the field, automatically entered in the log when a new contact is logged. Not all fields can have a default value. In the Serial Sent field, use the number sign (#) to have CommCat enter the current contest serial number for this contact. |
Edit |
Include this field in the Data Entry Fields panel. The color of this column is the same as the color used as the background of the Data Entry Fields panel. Choose Show All Entry Fields from the Edit menu to initialize the Data Field Entry panel to show all fields. Choose Hide All Entry Fields to remove them all. |
Line |
The line number on which the data box appears in the Data Entry Fields panel. The color of this column is the same as the color used as the background of the Data Entry Fields panel. The position of the data box relative to other boxes on the same line is determined by the Grid column order (see above). |
Dupe |
When checked, the contents of this field are used when searching the log to see if this station has been worked before. Only check boxes with a white background are available for dupe checking. |
Select the Labels Above or Labels to Left option to set the position of data labels in the Data Entry Fields panel. Click Background Color to open a color section window to specify the color for the background of the Data Entry Fields panel.
The rows in the Detail Grid can have alternating colors. The Foreground Color set the color of the font.
Transmitter and receiver names can be entered as defaults in this window. If both are the same, or only the transmitter is entered, CommCat assumes the rig is a transceiver for reporting purposes. Every QSO will receive the transmitter and receiver names entered here. If you wish to have CommCat use the current rig (one of the 4 rigs CommCat can control through menu selection) for these fields when a new QSO is entered, leave the default values blank.
Saving a Modified Log Style
Once you have made changes to a log style, you can save the style for later use. Click Style on the Log Style Editor menu bar and choose Save Log Style. You can save the modified log style using a different name by choosing Save Log Style As and then specifying the new log style name.
Opening an Existing Log Style
Choose Open Log Style from the Style menu to open an existing log style. When the Log Style Editor window is closed, the style that is presently in use is assigned to the current log. In this manner it is possible to change the style for any log.
Creating a New Log Style
Choose New Log Style from the Style menu to create a new log style. (You can also create a new log style based on an existing style by using the Save Log Style As option described above.)
Deleting a Log Style
Delete the current log style by choosing Delete from the Log Style Editor Style menu. Deleting a log style does not delete modify or delete any log data that has used that style. The All Fields style is permanent and cannot be deleted.
Setting Log Style Defaults
Defaults are values that CommCat will automatically add to a log entry when a new contact is added. Each log style has its own set of default values.
The default values include:
•Mode |
•QSL Sent |
•QSL Received |
•QSL Sent Type |
•QSL Sent Via |
•QSL Received Type |
•QSL Received Via |
•QSL Note |
•Serial Sent |
•Serial Received |
•Contest ID |
•Receiver |
•Transmitter |
•Amplifier |
•Transmitted Power |
•Transmit Antenna |
•Heading |
•Receive Antenna |
•Export? |
•Source |
•My Call |
•Propagation Mode |
•Satellite Name |
•Satellite Mode |
•Comment |
Click Set CommCat Defaults to load the following defaults into the named fields:
Field Name |
CommCat Default Value |
|---|---|
QSL-S |
N |
QSL-R |
N |
QSL Sent Type |
Card |
QSL Sent Via |
Buro |
QSL Received Type |
Card |
QSL Received Via |
Buro |
QSL Note |
73 es gud dx! |
Receiver |
From CommCat Rig/Ant Settings |
Transmitter |
From CommCat Rig/Ant Settings |
Amplifier |
From CommCat Rig/Ant Settings |
TX Power |
From CommCat Rig/Ant Settings |
Export |
No |
Source |
CommCat |
My Call |
From CommCat Station Settings |
To clear all default values, choose Clear Defaults from the Defaults menu.
Log Window Toolbar
Log Contact |
Log the contact for the specified station. Click the down arrow to set the Manual Data Entry mode. Click the down arrow and then Start Now to freeze the current time as the start time for this QSO, or click Start QSO in the menu bar. After you have entered a start time, log the contact to set the ending time. |
Start QSO |
Click Start QSO to enter the QSO Start Time. The Date and Time Start fields are gray after the QSO has been started. You can look up and edit data in the Data Entry Fields until you log the contact. If you attempt to change frequency or the DX Focus call after the QSO has been started, you are asked permission before changes are made. If you edit the call after the QSO has been started, the contents of the data entry fields are cleared (except for the tine and date start, RST, and Comment fields. |
Lookup |
Fill the pending contact data boxes with information from CommCat databases, external call sign databases, and the GoList QSL Manager database if present. Set the Lookup options in File>Settings>Station>Log to have CommCat look up data for every QSO as logged. If the County entry box is used, it will be filled for US calls when the county is found. Click the down arrow on the County box to change the county to another in the same state. |
View |
Open Log Style Editor or show/hide the sidebar. |
Send Spot |
Send a spot announcement to DX Summit or a Telnet site, as specified in settings. |
Card Now |
Prepare a QSL card for the selected contact or contacts. Click the down arrow to submit the selected contact to eQSL or print a Dymo or Brother Label. If you select eQSL,Dymo, or Brother, that choice becomes the default for the Card Now button until you restart CommCat. |
All Logs |
Show information from all logbooks in the current Master Log, not just the current log. The logs included when you select All Logs can be set in File>Settings>Station>Log. If you have created new logs from old, using the Log Select option to ignore the cloned log prevents duplicate contacts from being displayed. |
All Contacts |
Show all contacts in the current log, not just those for the current call. All Contacts is turned off when you search for a new call or display selected QSO's. |
Find QSO |
Open the Log Search window to search for a contact in the current log view. (To search through all contacts in all logs, click the All Logs and All Contacts buttons at the top of the Log window.) Contacts must be displayed in the detail grid for the Find QSO button to work. |
Edit |
Open the Edit QSO window for the selected contact. Click the down arrow to access a menu providing QSO Edit, Log Style Edit, or Logbook Edit. |
Settings |
A short cut path to most Advanced Log settings. |
Clear All |
Start a new log entry for a new contact. |