Overview
The Log Maintenance functions help you maintain data, import and export log data, and delete duplicate data.
Starting a New Log
You can have as many logs as you like in CommCat. The Main log is provided with CommCat, but you can add additional special logs suitable to your interests, such as RTTY or QRP. You may also wish to maintain separate logs if others operate at your station, or if you operate in a different location some of the time.
To create a new log, click New Log... on the File menu. The New Log window opens.
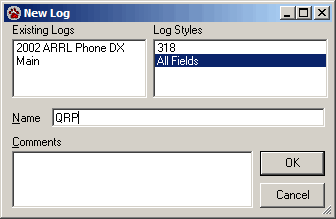
The names of existing logs are shown in the Existing Logs list. Each log has an associated style. Available styles are listed in the Log Styles box.
•Select a Log Style for your new log.
•Enter the name of the new log in the Name box.
•Add any comments you wish in the Comments box. This information can serve as a reminder about anything special in this log.
•Choose OK to accept the new log and close the New Log window. The new log is now the default for CommCat until you change it.
Opening an Existing Log
Existing logs can be opened at any time. Once a log is opened, it becomes the default log for CommCat until you open another log or create a new one.

To open an existing log:
•Click Open Log... on the File menu.
•Select the log you wish to open from the list of existing logs.
•Add any comments in the Comments box.
•Click OK to accept the log and close the Open Log window.
Saving a Log with a New Name
Choose Save Log As... from the File menu to save an existing log with a new name. The original log is kept, and a copy of that log is created with the new name. CommCat provides three options:
Save current log as |
Creates a clone of the current logbook, with a new name. |
Save a combination of logs as |
Specify the logs you want to combine and save under a new name. |
Save selected QSO's as |
Use selected contacts in the Advanced Log to create a new log. |
Deleting a Log
IMPORTANT: Proceed with caution. If you delete a log it is impossible to reverse your decision. Back up your data before deleting a log. |
CommCat allows you to delete the current log or all logs. Once you start to delete a log, CommCat will ask twice to make sure that is what you want to do. If you are uncertain, click the Cancel button.
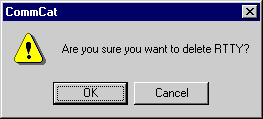
To delete a log:
•Choose Current Log or All Logs from the Delete, Maintenance option on the File menu.
•Click OK and then OK once more on the second warning dialog box.
Merging Two Logs
If you wish to merge the contents of two logs, here is how to proceed:
1.Open the source log (the one to be copied into a second log)
2.Open the Advanced Log
3.Select any contact
4.Type Ctrl+A to select all contacts
5.Type Ctrl+C to copy all selected contacts
6.Open the destination log (the one that will contain the merged contacts)
7.Select any contact in the Advanced Log
8.Type Ctrl+V to paste the contacts
Changing a Log Style
To create a new style or change the current style for a logbook, see the Advanced Log topic in Tools help. A style associated with a log can be easily changed at any time with no loss of data.
Import
Logs from other programs can be imported into CommCat. ADIF and TRX Manager formats are supported and more may be added in the future. ADIF files normally have an extension ADI.
ADIF Format
CommCat converts logs from other programs in the ADI (Amateur Data Interchange) format. Most programs can export data in this format, while others rely on third-party utilities to provide the conversion. Check with the author of your software to find what options are available if it does not appear that ADIF export is supported.
LoTW Import is covered in its own Help topic.
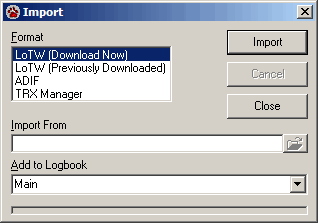
To Import an ADIF file:
•Select ADIF in the Format List
•Click the Folder Open button on the Import From line and locate the file you wish to import.
•Select the Logbook you wish to receive the converted data, or enter a new Logbook name in the Add to Logbook box.
•QSL Sent and QSL Received data are imported, if present. When these items are not present, CommCat uses the default preference you have set up for the Log Style. (For example, QSL-S and QSL-R can be blank, or set to N.)
•Start the conversion by clicking Import.
As the file is imported the progress is shown in the bar at the bottom of the window. If you wish to cancel the import at any time, click Cancel.
After the file has been imported, CommCat displays the number of potential conversion errors it found and asks if you wish to see the details. Click Yes to open a Notepad window containing the conversion details. This report will be useful in the future to correct any problems that have been encountered. It is best to save the report using a new name so that you can go back to it later--otherwise it will be overwritten during the next conversion.
Several tools are available to help correct problems. The Active and Inactive Prefix Grid windows (File, Maintenance, Entities) provide a quick reference to prefixes and their DXCC numbers. To see the details for any entity connected to a prefix, double-click the associated grid line to open the Entity Editor window.
See the Import Editor Help topic later in this section.
TRX Manager Format
TRX Manager is a powerful program that uses a database format CommCat can import directly without going through the ADIF process. To convert a TRX Manager log file, click TRX Manager in the Format list and proceed as above. An error report is not generated with a TRX Manager import.
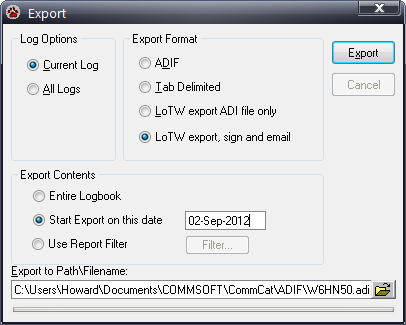
Export
Logs can be exported from CommCat to other applications in the ADIF or Tab Delimited format. ADIF is useful for other ham logging programs that can import ADIF data, while the Tab Delimited format is useful for other applications, such as spreadsheets, that can provide useful data manipulation routines for your log data.
Export to LoTW is covered in its own Help topic.
ADIF Format
To export log data to an ADIF file:
•Select Current Log or All Logs to specify the data to be converted.
IMPORTANT: CommCat uses part of the ADIF specification that allows logging programs to define custom fields. The ADIF export option uses this capability to include the CommCat log name in the transfer. If you export a log destined for another logging program, the log name is NOT preserved.
This limitation is NOT true when you upload a CommCat log to your logbook on MyQSX.net. Likewise, log names are preserved when you download a log from MyQSX.net
If you wish to export an ADIF file that does not include this custom field, use the LoTW export file only export option. |
•Check the Use Report Filter box if you wish to use additional data filtering provided by the Report Settings window.
•Select the ADIF radio button.
•Enter the path and filename of the file you wish to create in the Export to Path\Filename box.
•Click Export to start the export process. Progress is shown in the bar at the bottom of the Export window.
Files exported in the ADIF format are given the extension ADI.
Tab Delimited Format
Proceed as above, selecting Tab Delimited rather than ADIF. The status bar does not reflect progress. Files exported in the Tab Delimited format are given the extension TXT.
Backing Up Log Data
Backing up valuable data is important for any computer application. CommCat provides a number of back up capabilities you can use depending on your needs. No matter what strategy you use, make certain you save back up data on a disk independent of your computer. This can be done to another computer on a network, another folder on the local computer, a memory stick, or CD-R/W disk.
Backing up a logbook backs up all logbooks, logbook styles, and award data. The Spotter Distance, Spotlist (and Rules), BandPlan, and Antenna databases are included with the backup. Note that when you restore, only the logbook database is restored automatically.
Manual Backup
Choose Logbook from the File, Maintenance, Backup menu.
CommCat asks if you want to back up to the specified directory. Answer Yes to proceed, No to specify another folder, or Cancel to stop the backup process.
The logbook is saved in the specified folder using the name Logbook.zip.
If you have a CommCat Live account, you can also save your logbook backup on your site for safe keeping. Check the option "Ask to Upload Logbook ZIP" in the Live settings General tab. When you create a ZIP backup, either automatically or manually, CommCat asks if you want to upload the file.
Automatic Backup
You can instruct CommCat to back up data when you leave the program, on a timed basis, or after a specified number of contacts.
To specify your backup strategy:
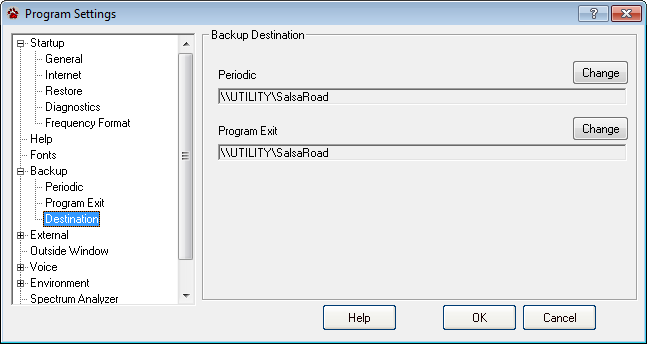
•Open the Program Settings window from the File>Settings>Program menu option and expand the Backup option.
•Check the backup schedule options you wish to use in the Periodic window.
•Select "Interactive" if you wish CommCat to ask each time it is about to back up, or "Silent" if you don't want to be asked.
•Check "Backup only when changes" if you want CommCat to skip the backup if there have been no changes in the log since the last backup.
•Click Program Exit and select the options you wish to use, as above.
•Open the Destination window to specify the folder you want (for periodic backups, or for program exit backups) to use for a backup.
•Click OK to accept any changes and close the Program Settings window.
Log data is saved in a file named the same as your Master Logbook name, usually Logbook.ZIP. Separate destinations can be set for periodic and program exit backups. The standard ZIP format is used. Note that Silent backups only back up the log, whereas Interactive backups back up the log and other CommCat databases.
Restoring Log Data
To restore a previously backed up log, choose Restore from the File, Maintenance menu. The CommCat Restore Log window opens to invite you to specify the log file you wish to use.
Logbooks can be restored from a backup on your local hard drive. If you have a CommCat Live account, you can also download a backup you have saved on your site and restore it. When you download a backup from your CommCat Live site, the ZIP file is named logbook_from_live.zip and is located in your CommCat Backup folder.
CommCat displays the time and date of the file you have specified and asks you to confirm that you want to restore the current logbook file. Choose Yes to proceed. Once the restore is complete, data from the backup replaces all data in all logs, all styles, and all award data.
The Spotter Distance, Spotlist, BandPlan and Antenna databases are restored to the CommCat Backup folder. If you wish to restore one of these supporting databases, copy and paste it into the CommCat Databases folder.
Separate Log Files
It is possible to use separate log files even though CommCat allows you to maintain as many logs in a single log file as you wish. You can archive an existing log by copying it to any name other than Logbook.mdb. This process leaves the original logbook file and the a new logbook file having the same data under a new name. Once you have created a separate copy of the log file, all log data in the original log file can be deleted through the File, Maintenance menu. Be sure to create a backup of your logbook before proceeding.
If you maintain separate logbook files you may not be able to use many of CommCat's logging features, such as award tracking and dupe checking.
Deleting Duplicate Log Records
Duplicate log records can occur accidentally by saving a contact more than once, by importing a log some which has already been imported, or one that already has duplicates. The Delete Duplicate Log Records window provides a way to automatically detect and delete duplicate log entries. CommCat uses the call, start date, start time, mode, band, and QSL data to detect duplicates. With the exception of the QSL data, if any of these items do not match in two log entries, a contact is not considered to be a duplicate.
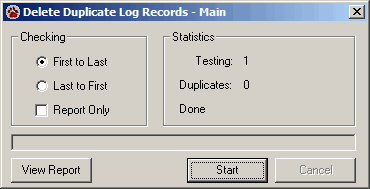
The QSL data is examined to make sure the most accurate QSL sent and received data are retained, no matter what checking order is used. A contact with QSL sent and QSL received set to Y is the highest priority. If not found, the first contact with one or the other QSL status set to Y is retained. If two contacts are found with one having QSL Sent set to Y, and the other with QSL Received set to Y, the contacts are combined into one with both set to Y.
Duplicate checking can be done starting at the top (earliest entry) or bottom (latest entry) of the log. When duplicates are found, the first log record found is left and the following duplicates are deleted. If you choose First to Last, the contact that was first entered in CommCat (not necessarily the earliest contact) will be retained. If you choose Last to First, the last log contact is retained. This distinction is useful if you import a log with duplicates, and then want to keep the most recently imported contacts in your log.
Check Report Only to have CommCat prepare a report without deleting contacts. If you do not check this option, CommCat deletes duplicates at the end of the process.
Duplicates are only checked in the current log.
Log Database Cleanup
An external program named Maintenance.exe is provided with CommCat. It can be found in the CommCat folder. This program compacts the Log database and fixes other errors it finds. To run this program, close CommCat, then start Maintenance.
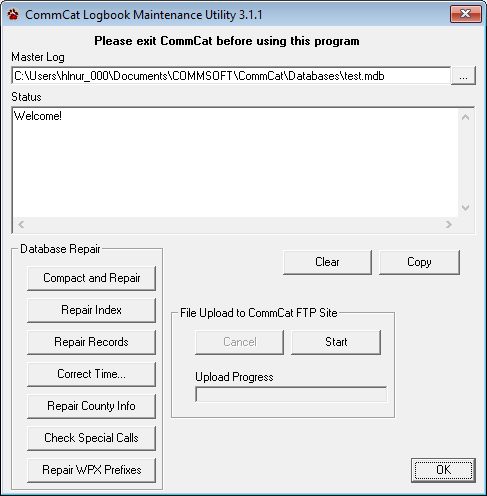
Select the Master Log you wish to repair. Unless you have set up new Master Logs your log will normally be logbook.mdb located in the CommCat databases folder.
Click Compact and Repair to start the maintenance process. As maintenance progresses, status messages are displayed in the Status window. Next click Repair Index to check the internal indexes in the Logbook database. CommCat checks individual QSO records when you click Repair Records. After the process is completed, click OK to close the CommCat Logbook Maintenance Utility window.
The Correct Time function allows you to apply a positive or negative offset to all start and end times in a logbook. The offset should be entered as hh:mm for positive offsets and -hh:mm for negative offsets. This option was requested to correct a log that had been created using local time rather than UTC.
Repair County Info fixes the CNTY information imported into CommCat where the state information is incorrectly formatted. For example, if the imported county is shown as CA,Sonoma in the county field, this function removes CA, from the field.
Check Special Calls checks the entity database for calls entered as special calls that are not marked as such. If a call is not marked correctly, the entity for that call may be identified incorrectly.
Repair WPX Prefixes checks all QSO's in your log for incorrect WPX Prefixes. When it finds a bad prefix, it corrects that QSO with the right prefix. When it is done you will see the number of records that have been corrected. Back up your log before running this process!
It may be necessary for you to send a copy of your log to the CommCat FTP site for analysis if a problem is encountered. Find the log file you wish to send (normally as shown in the screen shot), then click Start. Your log is compressed then sent. If you wish to cancel the upload, click Cancel. As the log is sent, progress is shown in the Status box.
FixPJ
An external program named FixPJ.exe is provided with CommCat. It can be found in the CommCat folder. CommCat Entity Updater updates CommCat's entity and prefix databases for the PJ entity changes made on 10/10/2010. If you started using CommCat version 4.2 or later, you do not need to use this utility. These changes can be made manually inside CommCat using the Entity Editor. FixPJ automates the job for you.
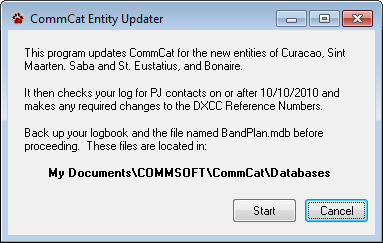
To run this utility, exit CommCat and run FixPJ. FixPJ does the following:
1.Retires Netherlands Antilles, DXCC 85, showing it and its prefixes as deleted as of 10/10/2010.
2.Retires Sint Maarten, DXCC 255, showing it and its prefixes as deleted as of 10/10/2010.
3.Adds Curacao, DXCC 517, along with the prefix PJ2, as of 10/10/2010.
4.Adds Sint Maarten, DXCC 518, along with the prefix PJ7, as of 10/10/2010.
5.Adds Saba and St. Eustatius, DXCC 519, along with the prefixes PJ5 and PJ6, as of 10/10/2010.
6.Adds Bonaire, DXCC 520, along with prefix PJ4, as of 10/10/2010.
7.Scans your logbook for any DXCC 85 or DXCC 255 contacts after 10/10/2010 and changes the DXCC number to the correct number (based on prefix), along with country name, and CQZ/ITUZ numbers where appropriate.
Synchronizing your MyQSX Log with your home log
If you are using CommCat Mobile, you can log contacts while away from home. The contacts are added to your online log at MyQSX.net/mylog. To synchronize your MyQSX log with your home log, go to File>Maintenance>MyQSX Log Sync.
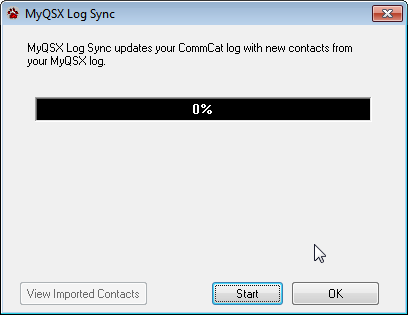
This is a one-way synchronization. That is, any contacts found in your MyQSX log that are not contained in your home log are automatically downloaded. No contacts from your home log are deleted or sent to your MyQSX log. Once you have imported your new contacts, click View Imported Contacts to see a list of the contacts that have been added.
Beginning with CommCat 4.5, new contacts logged from CommCat Mobile are sent to your CommCat log immediately. CommCat must be running and connected to CommCat Mobile for this transfer to take place.