The CommCat Label Designer window provides tools for creating personalized labels for pre-printed QSL Cards and address labels. Labels can be designed from scratch, selected from a collection of sample labels, or you can use one of the samples as the basis for a new design.
CommCat supports the Dymo Label printer through a menu option on the Advanced Log. Please see the Advanced Log Help topic for complete information. When you have specified the Dymo format, the Report Label option on the CommCat menu is disabled.
Label Designer Overview
The Label Designer window, shown below, provides a canvas for designing or modifying labels, tools for creating shapes and patterns, a color selection palette and fill pattern selector, and a list of data items that you can add to the label.
The controls on the Label Designer window are similar to those on the QSL Card Designer. Please refer to the QSL Report Topic for more information.
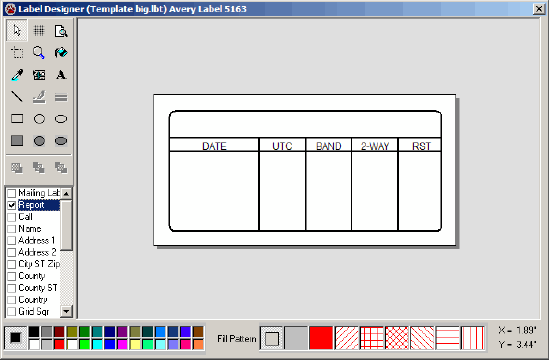
Report Block


The Report Block is filled from Logbook data when the labels are printed. The following items are included in the Report Block:
RADIO |
Call sign of the station you contacted. |
DATE |
The contact date using UTC (Universal Coordinated Time, also known as GMT). |
UTC |
The time for the start of the contact, in UTC. |
BAND |
The band used for the contact, in meters. |
2-WAY |
The mode (CW, SSB, etc.) used for the contact. |
RST |
The signal report for the station you contacted. |
To change information printed incorrectly in the Report Block, open the CommCat Log window, locate the entry containing the incorrect information and make any necessary changes.
Use Print Preview to check the contents of a Label before printing it.
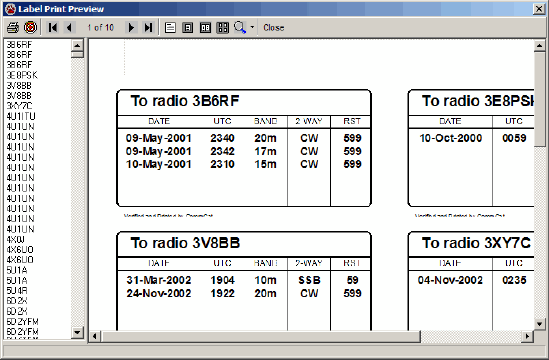
The size and location of the Report Block can be changed by selecting the report object, then dragging the object handles to achieve the desired size or location. CommCat fills the report block with as many contacts as will fit for each call sign. Drag the height of the report block to adjust the number of contacts that will fit. As you make the Report Block narrower, the font size is made smaller to compensate. With a smaller font size, more contacts will fit in the Report Block.
Two report block styles are provided with CommCat. The second style shown above includes the call of the worked station on each line. The alternate style places the call of the worked station in a special area at the top of the block, and has columns for Date, UTC, Band, 2-Way, and RST. To change the report block style, choose Report Grid... from the right mouse menu, select the style you want to use, then click OK on the Report Settings window.
Use the first style (call on top) if you are using a label smaller than 3" wide.
Address Labels
The Label Designer allows you to include address labels for mailing QSL cards when you print labels. You can print report labels, address labels, or both. When you specify that you want report and address labels, CommCat includes any address labels along side the QSO labels that apply.
To include address labels, check the Mailing Label option in the item list. Address labels contain only the address of the intended recipient--no additional items from the list are added.
The caption "Mail to Address" appears on the label design when the Mailing Label option is checked. The caption is replaced by the actual address when it is found in the log.
QSL Mail Addresses are entered in the Advanced Log. Double-click any QSO in the log to open the Edit window for that contact. Scroll down to the QSL block of data to the QSL Address field. If the QSL Address field doesn't appear, close the Edit window and open the Log Style Editor by double-clicking the colored area behind the data entry fields. Scroll down the list and add a check to the Grid option for the QSL Address field.
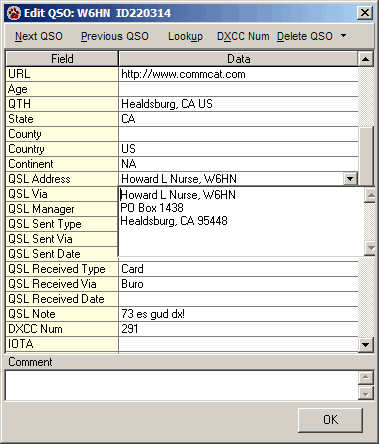
Once the QSO you wish to use is displayed in the Edit QSO window, click the down arrow on the right side of the QSL Address field to open the text edit box for the address. You can enter the address manually, or click Lookup in the Edit QSO menu to have CommCat complete the address.
Saving a Label Design
Label designs are saved in Label Template files that can be used to create labels, shared with other CommCat users, or stored for later use and modification. From the File menu, choose Save As to name the Template file and then save it. Existing Template files can be opened on the Canvas by choosing Open from the File menu.
When a Template file is opened, the data contained on the label is updated with information from the CommCat settings you have entered. Use Label Templates to share your label design with other CommCat users.
In addition to saving a Label design as a Template file (lbt), you can save the design as a graphics file in the Bitmap (bmp), or Compressed (jpg) format. Note that these images will contain exactly what you see displayed on the Canvas. The Report Block will not contain contact data.
Creating a Label from the Design
To create a label from your design, click Print in the toolbar. The Print Preview window opens and displays the filled out labels. The number of labels per page depends on the label stock you have chosen in the Report Settings window. A screen view of the Label Print Preview window is shown below.
The starting row and column for the labels to be printed can be set in the Report Settings, Label window. Use these settings to start printing a label page that has been partially used.
Saving As a Graphics File
In addition to saving a Label design as a Template (lbt), you can save the design as a graphics file in the Bitmap (bmp), or Compressed (jpg) format.
Printing Labels
To open the Label Print Preview window, click Print Preview on the Label Designer toolbar. Labels can be printed on label stock that comes in many standard sizes. Select the label style you wish to use in the Print Setup window. Up to 500 labels can be printed but you will normally only print a few. The list of calls in the current log is displayed at the left side of the Print Preview window. The calls are listed in call sign order.
Preparing to Print
You can print a selected label or a range of cards. If you wish to print a selected label, select the call for the label you wish to print from the list in the window or use the navigation keys on the toolbar. Set the QSO start and QSO end number in Report Settings to print one or more labels.
Print Labels Toolbar
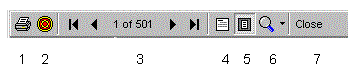
1 |
Print Labels |
2 |
Use Report Settings filter |
3 |
Navigate |
4 |
Fit page width in view |
5 |
Fit full page in view |
6 |
Zoom |
7 |
Close Print window, return to Designer |
Changing the View
Use one of the Zoom buttons (4, 5, or 6) to zoom in on the label page. You can also double-click the left mouse button to move in and double-click the right button to move out. Place the mouse pointer over the page of labels and drag the hand point to see different parts of an expanded page.