See also: Advanced Log
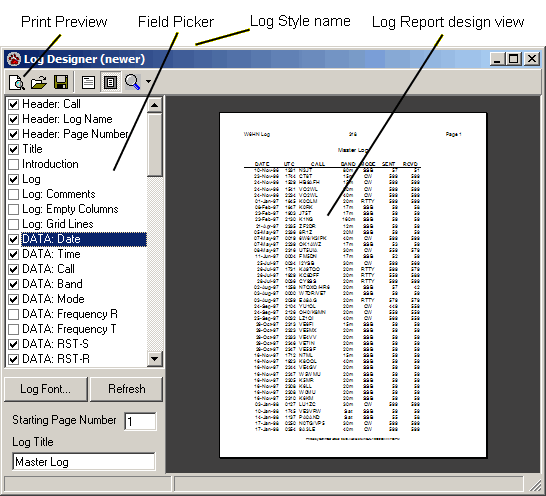
Use the CommCat Log Report window to format and print logbooks for the contacts you have made. Settings in the Report Settings window provide ways to filter the contacts and set the order contacts will appear. Choose the fields you wish to appear in the log from the Log Designer field picker. The log design you create can be saved for future use. The Log Designer window is shown below.

Formatting and Printing a Log Report
•Open the Log you wish to use by choosing Open Log from the File menu.
•Open the Log Designer from the Reports menu.
•Select the page format you wish to use after opening the Print Setup window from the File menu.
•Select the fields you wish to appear on the printed log report. The first 25 contacts from your log are shown.
•Select the fonts you wish to use for each report section.
•Save your design for later use.
•Click Print Preview on the Log Designer toolbar to go to the print preview view and print the report.
Special Fields
Most of the fields in the field picker list come directly from the corresponding fields in the CommCat log. Several of the fields, described below, have a special purpose.
Field Name |
Function |
|---|---|
Header |
The Header fields (Call, Log Name, page number) appear at the top of each printed page when selected. Call is your call and log name is the name assigned to the log you are using (such as Main). |
Title |
The Title is printed after the Header on the first page. The title is entered in the Title text box in the left bottom corner of the window. |
Introduction |
Taken from any notes that CommCat has created or you have entered manually for the Log. For example, when you import a log, CommCat creates a description of the import process in the log notes field. |
Log |
Select Log to include data from the CommCat log in the report. |
Log: Empty Columns |
Fields you have included in the report but which do not contain data are not shown on the printed report unless you check this option. |
Log: Grid Lines |
CommCat draws lines to separate contacts and columns when this option is checked. |
Making Adjustments
You may find that the layout of the log you wish to print isn't what you would like. CommCat provides a number of options to help you fine tune the appearance of the report.
•Remove or add fields using the check boxes in the field picker list
•Change the font size for the header, title, introduction and log sections
•Use landscape rather than portrait printing (use the Print Setup window to change orientation)
•Use a different size paper, such as legal (use the Print Setup window to change paper size)
Log Column Order
The order of columns on the log report is taken form the log style you have assigned to your CommCat log. This is the same order that is used for the data grid at the bottom of the Advanced Log window. If you wish to change the order fields appear you can adjust the log style as described in the Log help topic.
Log Contact Order
The order of rows (contacts) in the log report uses the same order the log uses. If you set the log to call order, the log prints in the same order. For further information on setting the log order see the Log help topic.
Starting Page number
If you are adding to a printed log with new contacts, you can set the starting page number for the current report. In this way, a continuous record can be kept even though the reports are printed at different times. If you are printing a log that has more than 5000 contacts, you can use the log filter to break the log into sections, then print consecutive reports while changing the starting page numbers.
Log Styles
The Log design you have created can be saved as a Log Style for later use. You may wish to have a number of log styles depending on how the log will be used. To save the current style, click the Save Log Style button on the Log Report toolbar. The next time you open the Log Report window, the most recently saved style is opened by default. To open another style, click the File Open button on the toolbar.
In addition to the list of fields you have selected for the style, the fonts, page size, orientation, and title are saved. It is possible to have one style designed for legal sized paper in the landscape format, or another style for index cards in the portrait format.
Printing the Log
Click Print Preview on the Log Designer toolbar to open the Log Print Preview window. The Print Preview process uses the entire log, not just the first 25 lines as in the Designer window. If you are printing a large log (more than several thousand contacts), it will take CommCat some time to finish formatting the log. Be patient.
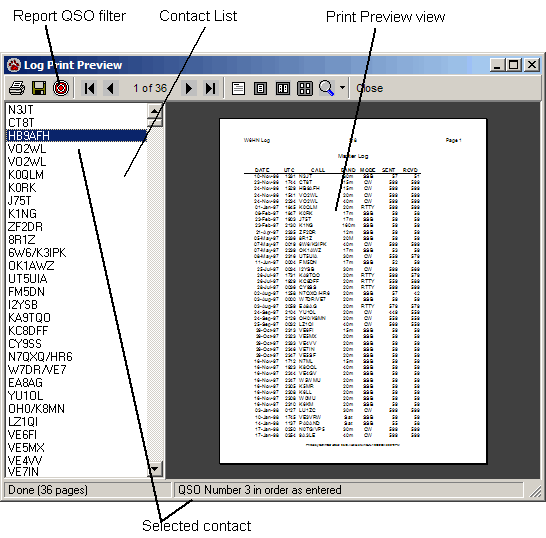
The Log Print Preview window is shown below. Note the Print Preview toolbar at the top of the window which provides access to a number of functions.

Log Print Preview Toolbar
Button |
Function |
|---|---|
Print the report (you can also choose Print from the File Menu). |
|
Save |
Save the log as an HTML file (HTM) for display on an Internet Web site, or Rich Text Format (RTF) for importing into a word processor. |
Filter (well, er, "target") |
Turn on and off any filter conditions you have set in the Report Settings window |
Navigation |
Scroll forwards and backwards through the report |
View |
Select Page Width, Full Page, Two Page or Many Page view of the report. |
Zoom |
Zoom in on the report to look at details |
Close |
Close the Log Print Preview window and return to the Log Print Designer |
Using the Report Filter
Open the Report Filter window by clicking the Target button on the toolbar, or choose Report Filter from the right mouse menu when the mouse pointer is over the contact list. Using the filter you can focus the report to a specified date range, call sign string, or record number range.
Contact List
The call sign List on the left side of the window shows all call signs that will appear in the report. Click any call to go to the page in the log that contains that call sign. The record number for the call you have selected appears in the status bar at the bottom of the window. If the record number is higher than 5000, the record number is displayed although the print preview page is not available. You can use the record number to set the report filter.
Canceling Print Preview
Press Escape to cancel the formatting of pages once the process has started.
Changing the View
The Log Report window can be resized to enlarge the view, or you can use Zoom to move the view in or out. You may also display two, or a number of pages in the Print Preview window.
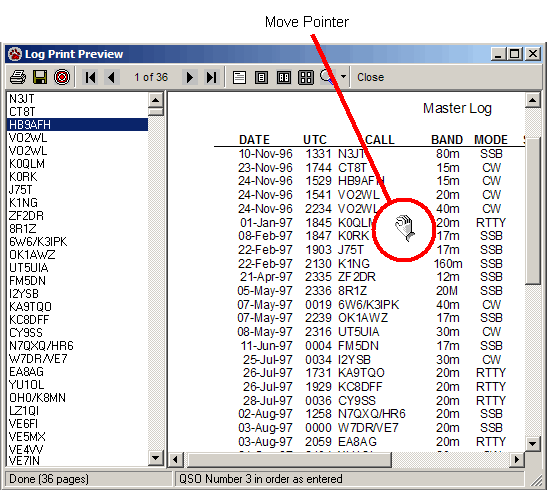
Use the Zoom and view buttons in the Print Preview toolbar to adjust the view. Double-click the left mouse button to enlarge the view, and double-click the right mouse button to compress it. Hold the left mouse button down and drag the hand pointer to move the view to a portion of the page that is not visible with the current zoom factor. The hand pointer is shown below.

Printing the Report
To print the report, click Print on the toolbar or choose Print from the File menu. You can select to print All pages, a Page Range or the selected page.