See also: Advanced Log
The CommCat QSL Card Designer window gives you the tools to create your own personalized QSL Cards. Cards can be designed from scratch, selected from a collection of sample cards provided with CommCat, downloaded from the CommCat web site, or you can use one of the samples as the basis for a new design.
QSL Card Designer Overview
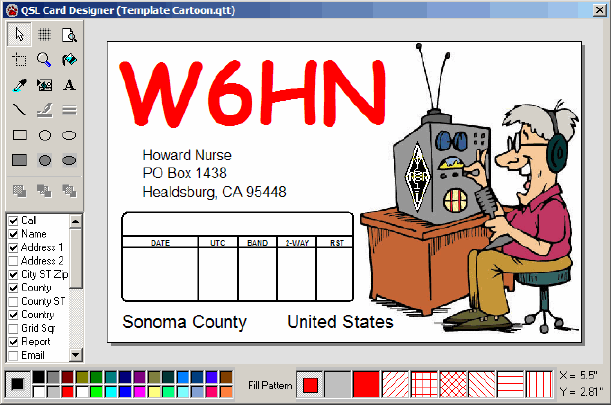
The QSL Card Designer, shown below, provides a canvas for designing or modifying QSL cards, tools for creating shapes and patterns, a color selection palette and fill pattern selector, and a list of data items you can add to the card.
The canvas represents a 3-1/2" x 5-1/2" QSL card. The card can be designed in a landscape format, shown below, or in a portrait format.
Graphics Tools
|
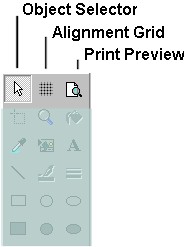
The Object Selector is used to select text, shape and image objects on the canvas. Selected objects have handles that allow you to adjust the size and position of the object. In addition, many objects can be filled with solid color or shading patterns, and the border color and border width can be changed. The Alignment Grid is provided to help adjust the position of objects. Lines are provided in quarter-inch increments. The Alignment Grid does not appear on the completed QSL Card. A light blue guide on the QSL Designer alignment grid shows the area to use if you are using 4" x 6" index cards for printing. Choose Print Preview to display the Print window. Data from contacts fills the report block in the Print Preview window, where you can print one or more cards. |
|
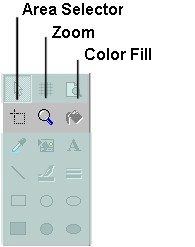
The Area Selector is used to define an area on the Canvas. A block of objects can be defined with the Area Selector, then removed from the Canvas by pressing the Delete key. Zoom provides viewing magnification of 2X and 4X. To remove the zoom, click the Zoom button or right-click the mouse over the canvas. Editing is not possible while the canvas is magnified. Shape objects (rectangles, circles, ellipses), text, and the QSL background can be filled with a selected color using the Color Fill tool. Select the color (and fill style when appropriate) you wish to use in the color palette, then click the Color Fill tool. The canvas background can be filled with a color (but not a transparent or patterned fill). Color Fill does not function with Images such as a map, the ARRL emblem, and image Bitmap. |
|
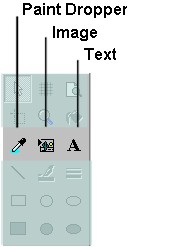
Use the Paint Dropper to copy a color from the canvas to the color palette. The selected color can then be used as a fill, line, or text color, in other objects, or the canvas background. The Image tool is used to insert an image from an external BMP or JPG file onto the canvas. Click Image, define the area on the canvas to which the image will be added, and a file dialog box opens allowing you to find and specify the image you wish to insert. The image is added to its own object on the canvas, which can then be moved and resized. You can edit the image with another application by choosing Edit Picture from the right mouse menu, after first selecting the image. The changes to the image do not appear on the QSL card until you reopen the QSL Card window. Text can be added to the QSL Card or existing text can be edited using the Text button. To add a new text object, click the canvas background or press ESC so that no objects are selected. Next click the Text button. Move the mouse back to the canvas and drag the mouse over the area where you want the text to appear. The Text Edit window opens after you have defined the area, where you can type the desired text. The text size is determined by the width of the area you have defined. To edit existing text, select a text object, click the Text button, and modify the text in the Text Edit window. The text, font selection, font size, font style, and font color can be edited.
|
|
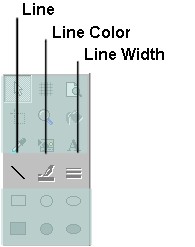
Create line objects with the Line function. Click the Line button, then drag the mouse over the area where you want the line. The line starts where you start to drag and ends where you stop. Press Shift while defining the area to create horizontal or vertical lines. Select the line object to enable the line color and line width buttons. The Line Color function allows you to set the color of line objects, or borders on Rectangle, Circle, Ellipse and Report Block objects. Select the color you wish to use from the Color Palette, select the object you wish to modify, then click the Line Color button. The Line Color button is enabled for selected objects whose line color can be changed. The Line Width function is used to change the width of Line, Shape or Report Block objects. Select the object you wish to change and click the Line Width button. The four possible line widths are set in succession as you click the Line Width button. |
|
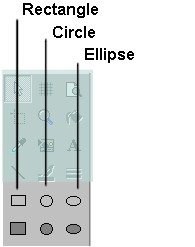
Draw Rectangle objects with the Rectangle tool. The top row of shapes in this section are transparent, while the bottom set are filled. Set the line color, fill color and style using the Line Width, Line Color and Fill tools. Draw transparent or filled Circles with the Circle tool. Click the Circle button, then drag the area on the canvas where you wish the circle to appear. The Ellipse tool is the same as the Circle tool except that ellipses can be drawn. |
Field Picker
Choose predefined objects to add to your QSL design.
|
The Field Picker contains a list of objects that can be added to the QSL Card. The data for most of the items in the list comes from information already entered in CommCat through the Selections windows. To add an object, click the check box next to the desired item. The object can be moved and sized once it is visible on the Card. To remove an object, select the object, then click the associated check box or press the Delete key. The position and size of deleted objects are retained, so you can return them to where they were by clicking the check box for the object you want to include. You can also Undo the most recent deletion of an object by pressing Ctrl-Z or choosing Undo from the CommCat Edit menu. |
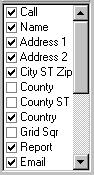
Field Picker Selections
Call |
Your call from CommCat Settings |
Name |
Your name from CommCat Settings |
Address 1 |
First address line from CommCat Settings |
Address 2 |
Second address line from CommCat Settings |
City ST Zip |
Your City, State and Zip from CommCat Settings |
County |
County name from CommCat Settings |
County ST |
Your county and state from CommCat Settings |
Grid Sqr |
Grid Square as computed by CommCat from your Latitude and Longitude entered in CommCat Settings |
Report* |
Report block (contact data are filled in from log data when QSL card is printed) |
Your E-mail address from CommCat Settings |
|
URL |
Your Web URL from CommCat Settings |
Rig* |
Rig description from CommCat Log |
Power* |
Transmitted power from CommCat Log |
Antenna* |
Primary antenna from CommCat Log |
Amplifier* |
Amplifier description from CommCat Log |
QSL Message* |
"73 es gud dx" canned message |
Map |
Map image of your country determined from country Setting |
Flag |
Flag image for your country determined from country Setting |
ARRL |
ARRL logo for use by ARRL members |
*These items are completed from log data when the card is printed.
Color Palette
Select colors to be used for objects.
|
Click a color on the palette to specify the color to be used in an object. The selected color is shown on the left end of the palette. Colors can be assigned to fonts, lines, borders of rectangles, circles and ellipses, and to fill styles. Fill Style |
Choose the style to be used to fill rectangles, circles, ellipses and the report block.
|
The fill pattern is selected from the fill palette shown to the left. The left most pane shows the currently selected fill pattern. The second (gray) pane is a transparent fill--when used to fill a shape, objects behind the shape show through. Canvas Position |
The X and Y coordinates shown in the bottom left corner of the Designer window report the position of the mouse pointer on the canvas.
|
The X and Y coordinates provide the position of the mouse pointer on the canvas as you move the mouse. The dimensions are in inches. |
Call Sign

The Call Sign object uses your call as entered in the Settings, Station window. Change the font size of the object by selecting it and dragging one of the object handles, or by changing the font size in the Font Window. You can also change the Font style, Italic, Bold, Underline, Strike Through and Color attributes for the Call object from the Font window.
The font selection list for the Call object includes all True Type fonts found on your system.
Report Block

The Report Block is filled from Logbook data when the QSL Card is printed. The block shown above should only be use for large format blocks, otherwise the printing will be too small.
The block shown below, selected in Report Options, is much better for small blocks. The call is only printed once in the top section.

The following items are included in the QSL Card Report Block:
RADIO |
Call sign of the station you contacted. |
DATE |
The contact date using UTC (Universal Coordinated Time, also known as GMT). |
UTC |
The time for the start of the contact, in UTC. |
BAND |
The band used for the contact, in meters. |
2-WAY |
The mode (CW, SSB, etc.) used for the contact. |
RST |
The signal report for the station you contacted. |
To change information printed incorrectly in the Report Block, open the CommCat Log window, locate the entry containing the incorrect information and make any necessary changes.
Use Print Preview to check the contents of a QSL card before printing it.
The size and location of the Report Block can be changed by selecting the report object, then dragging the object handles to achieve the desired size or location. CommCat fills the report block with as many contacts as will fit for each call sign. Drag the height of the report block to adjust the number of contacts that will fit. As you make the Report Block narrower, the font size is made smaller to compensate. With a smaller font size, more contacts will fit in the Report Block.
Two report block styles are provided with CommCat. The style shown at the top of this section includes the call of the worked station on each line. The alternate style places the call of the worked station in a special area at the top of the block, and has columns for Date, UTC, Band, 2-Way, and RST. To change the report block style, choose Report Grid... from the right mouse menu, select the style you want to use, then click OK on the Report Settings window.
Address Block
Add your name, street address, and city/state/zip to the card.
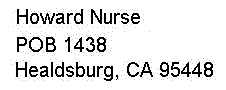 |
The sample address block shown here is composed of 4 objects, all chosen from the Field Picker list. The four objects are the Name, Address 1, Address 2 and City ST Zip items. Change the font attributes for any of the text objects using the Font window. The position and size of each of the objects can be adjusted by clicking the object, then dragging the object or one of the object handles. The information for each of the four blocks comes from the CommCat program settings. |
Country
Add your country name to the QSL Card.
|
The Country object uses your country as entered in the Settings, Station window. Change the font size of the object by selecting it and dragging one of the object handles, or by changing the font size in the Font Window. You can also change the Font, Italic, Bold, Underline, Strike Through and Color attributes for the Call object from the Font window. If you wish to change the country text for the Card only, click the country object, then click the Text tool. Change the text as desired, then choose OK on the Text Window to accept the changes and update the country object.
|
ARRL Logo and other graphics
Add the ARRL Logo if you are a member of the American Radio Relay League.
|
The ARRL object can be added to the QSL Card by choosing ARRL in the QSL Field Picker List. The position and size of the logo can be changed by clicking the logo then dragging the object or one of the object handles. To remove the logo from a design, click the logo then press the Delete key, or click the check box associated with the ARRL item in the Field Picker List. Other pre-defined graphics objects include the flag for your country, and a map of your country. It is not possible to change the color or text used in these graphics objects. |
Working with Objects
Each of the items--pictures, lines of text, shapes--on the QSL Card canvas is an object. An object can be moved and its size can be changed. Objects can be added using the tools collection, or from the Field Picker List. You can also create an object by pasting an image from the Windows Clipboard to the Canvas.
|
To select an object, click the mouse with the mouse pointer over an item. A selected object has a border enclosing the object with small solid squares in the corners and on each side called "handles." As you move the mouse pointer over handles, the pointer changes to an arrow that shows which way the handle can be dragged. When the mouse pointer changes to crossed arrows the position of the object can be changed by dragging. |
Deleting Objects
To delete an object, select it and press Delete. Use Undo (Ctrl+Z) to restore a deleted object.
Moving Objects
QSL objects can be moved by dragging them with the mouse, or by selecting them and using the Ctrl-Arrow keys.
Copy and Paste
The Copy command places an image of the entire QSL card on the Windows clipboard. It is not possible to copy individual objects.
The Paste command places the contents of the Windows clipboard on the canvas as a single object. This object can be manipulated in the same manner as any object--it can be moved and resized.
De-selecting Objects
Press the ESC (Escape) key to deselect all objects.
Starting a New Design
To start a new QSL design, open the QSL Designer window and choose New from the CommCat File menu. If you wish to change the orientation of the new design, choose QSL Settings... from the right mouse menu. Select either Portrait or Landscape, and click OK.
To use a QSL Template that has been provided as a sample with CommCat, choose Open from the CommCat File menu, navigate to the CommCat QSL folder, select a design, and click OK.
To download a QSL Template from the CommCat web site, choose Templates on the Web... from the right mouse menu. Download the design you wish to use, and follow the steps given below for sharing QSL designs.
Saving a QSL Card Design
QSL Card designs are saved in QSL Template files that can be used to create QSL cards, shared with other CommCat users, or stored for later use and modification. From the File menu, choose Save As to name the Template file and then save it. Existing Template files can be opened on the Canvas by choosing Open from the File menu.
When a Template file is opened, the data contained on the card is updated with information from the CommCat settings you have entered. Use QSL Card Templates to share your card design with other CommCat users.
In addition to saving a QSL Card design as a Template file (qtt), you can save the design as a graphics file in the Bitmap (bmp), or JPG Graphics File (jpg), or Compressed (zip) formats. Note that the Bitmap and JPG images will contain exactly what you see displayed on the Canvas. The Report Block will not contain contact data. The Compressed (zip) format includes the Template file and any images used to create the card.
Sharing QSL Designs
CommCat provides two ways to share QSL Template files. Designs may be sent via e-mail directly to another CommCat user, or submitted to the CommCat web site to be shared by all. In both cases, the necessary files are gathered into a compressed (zip) file and attached to an e-mail. Once received (or downloaded from the CommCat web site), the QSL Templates are opened as zip files--do not unzip the file when you receive it.
To send the design to an individual user, choose E-mail Template.. from the right mouse menu after opening the design you wish to share. Complete the e-mail by adding the address of the individual you wish to receive the design, and adding any comments you wish to the message.
To submit the design to the CommCat web site, choose Submit Template... from the right mouse menu after opening the design you wish to share. Complete the e-mail by adding a description and credits to the message. Please do not submit any copyrighted material to the CommCat web site. All submissions will be reviewed before they are added to the QSL Template page.
When you receive a compressed QSL template file from another user, or download one from the CommCat web site, save the file to disk rather than opening it. Save the file in any convenient folder, including the recommended CommCat QSL folder. To view a Compressed (zip) Template file, open the QSL Designer window, choose Open from the File menu, and set the Filter Type to Compressed (zip). Locate the file you have saved to disk, and click OK.
Creating a QSL Card from the Design
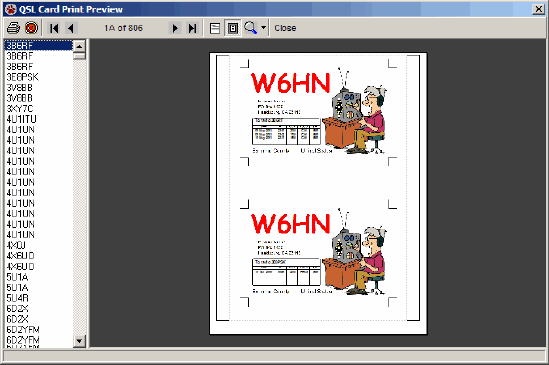
To create a QSL Card from your design, click Print Preview in the control group, or choose Print Preview from the CommCat File menu. The Print Preview window opens and displays the filled out card or cards, depending on the size of paper you are using. If you are using 4 x 6 inch index cards, one QSL is printed per card, while using an 8 x 11-1/2 inch page will yield two cards per page. A screen view of the QSL Card Print Preview window is shown below.
Additional QSL File Format details
Printing QSL Cards
To open the QSL Card Print Preview window, click Print Preview on the QSL Designer toolbar. Depending on the capabilities of your printer, cards can be printed on single card stock or on card sheets. In the view below, 2 cards per sheet are shown. Up to 5000 QSL cards can be printed at one time but you will normally only print one or two.
Preparing to Print
Click File, Print Setup to select the page format you wish to use to print QSL cards. You can print a selected card or a range of cards. If you wish to print a selected card, select the call for the card you wish to print from the QSO list in the window. Click the Target button. You will see the number for the selected card which should be entered in the QSO Start Number and QSO End Number boxes. You can also select QSO's in the Advanced Log and use that selection to print cards.
Calls are listed in alphabetical order. If there are more than one contact for a call, as many contacts as will fit are listed in the report block. Contacts for the same call that do not fit are printed on the next card.
Use the Report Filter in Report Settings to limit the number of cards that appear in the Call list. You can limit the contacts by date, number, or QSL sent/received data. When "P" has been entered in the QSL Sent field for a contact, you can have CommCat convert that "P" to "Y" when the card is printed. To open the Report Setting window, choose Report Filter... from the right mouse menu.
Print QSL Toolbar
1 |
Print QSL card(s) |
2 |
Report Settings filter |
3 |
Navigate |
4 |
Fit page width in view |
5 |
Fit full page in view |
6 |
Zoom |
7 |
Close Print window, return to Designer |
Working With 4" x 6" Card Stock
4" x 6" card stock is a convenient material for printing cards. Photo grade 4" x 6" paper is also available for printing high quality images. Once printed, the card can be trimmed to the normal 3-1/2" x 5-1/2" QSL card size.
Printers vary on how they handle index card stock. The horizontal and vertical offset for the card image can be set in Report Settings to accommodate different printer requirements. Some experimentation will be necessary to get the best results. To open the settings window, click QSL Settings from the right mouse menu.