See also: Spectrum Analyzer, DX Spot Manager
The DX Tracker provides a graph of frequency activity. The spots are shown in the upper panel while the corresponding signal levels for each spot are shown in the bottom panel. The signal levels are updated when you tune to a spot. |
Overview
The DX Tracker window provides a number of useful functions.
•Track the stations a DX operator is working to analyze his operating patterns.
•Look for clear frequencies inside the spread of a DX pile up.
•Tune through a band of interest and mark frequencies you want to revisit.
•Set up custom scans to listen for a DX station who operates consistently on the same frequencies.
•Transfer spots from the DX Spot Manager window and then scan those spots for active signals.
•Use your radio as an HF scanner.
The DX Tracker window contains two panes. The upper pane displays a frequency range on the vertical axis with the range adjustable from +/- 1 KHz (2 KHz) to +/- 15 MHz (30 MHz). Two frequency markers (green or yellow horizontal lines) can be shown, the green representing VFO A and the yellow VFO B. Frequency points of interest, called scan points, appear as dots connected by a red line. The collection of scan points is the scan set. Scan sets can be named, saved, and recalled later.
The lower pane contains signal level bar graphs for each scan point. The bar graphs are updated from the transceiver's s-meter readings (not all radios provide this data). The active bar graph is green, while the inactive bar graphs are red. The radio must support s-meter reading through its data port for the bar graphs to operate.
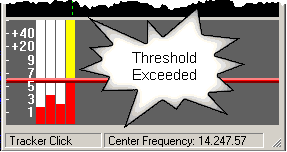
A threshold, represented by the red line, can be set by clicking a point on the signal bar graph pane. If a signal exceeds the threshold, the upper portion of that spot's bar graph is painted yellow. Once a signal has exceeded a threshold level, a number of actions can be specified.
Scan points can be added to the DX Tracker in a number of ways, including double-clicking the scan point position, clicking the Set toolbar button, double-clicking a frequency on the Spectrum Analyzer window, or transferring spots from the DX Spot Manager. Through the DX Spot Manager, spots can be transferred automatically by setting up a rule, or manually.
You can also use scan points to provide an indication of the frequency limits of a pile up. These limits are useful as you tune through a pile up as a visual cue that you have reached one frequency limit or the other.
Click a scan point to tune the radio to the spot frequency indicated by the dot.
Starting a New Scan Set
A DX Tracker scan set is initialized in one of several ways:
•Open the DX Tracker window. The center frequency of the window is set to the current active VFO frequency.
•Click the Reset button on the DX Tracker toolbar to set the center frequency of the display to the frequency of the currently active VFO.
The green frequency marker is set to the center of the display. Set the desired bandwidth of the display by clicking the bandwidth button on the toolbar. Bandwidths from 2-kHz to 30-mHz can be selected.
Setting Scan Points
•Tune the radio to a frequency of interest and click Set on the toolbar to create a scan point for that frequency.
•Double-click a point in the upper panel to set a scan point.
•Double-click a frequency on the Spectrum Analyzer to set a scan point for that frequency.
•Define a rule in the DX Spot manager to transfer spots automatically.
•Click a spot in the DX Spot Manager list, then choose Transfer Spot from the right mouse menu
Recentering a Scan Set
To recenter a scan set, click a scan point of interest to tune the radio to that frequency. Then choose Reset Center Frequency from the right mouse menu. Adjust the bandwidth as necessary to show all spots of interest.
Scanning
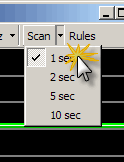
Click Scan on the DX Tracker toolbar to start CommCat scanning through the scan points. Press the Escape key (or click the Scan button) to stop scanning and hold the current frequency. The scan rate can be set from 1 second per scan point to 10 seconds per scan point. Select the scan rate you wish to use from the Scan menu after clicking the down arrow next to the Scan button.
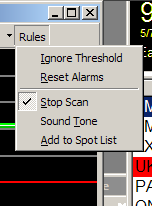
Scanning can also be stopped if a signal level exceeds the threshold level. Click the Rules button on the toolbar to see the list of possible actions when the threshold is exceeded. Reset the threshold alarms by clicking the right mouse button an choosing Reset Thresholds from the context menu.
Manual scanning is provided through the arrow keys on the keyboard number pad. Use the Right arrow to step to the next scan point to the right, and the Left arrow to step to the next scan point to the left. The Home key moves to the first scan point, while the End key moves to the last.
Removing a Scan Point
To remove a scan point from a scan set, position the mouse pointer over the point you wish to remove. Choose Remove This Point from the right mouse menu. The scan set is redisplayed minus the deleted scan point.
Resizing the DX Tracker Window
The maximum number of scan points displayed in the DX Tracker window depends on the width of the window. To increase the width, drag the right side of the window with your mouse. The most recent scan points are always shown in the window. You can also resize the height of the DX Tracker window by dragging the top or bottom border of the window. The vertical scale of the window is changed to reflect the new height of the window. Adjust the size of the signal level bar graph panel by dragging the bar that separates this pane from the scan pane.
Moving DX Tracker Out of the CommCat Main Window
If you wish to move the DX Tracker window out of the Main CommCat window, check the DX Tracker option on the File, Settings, Program, Window Position window. This option is useful if you want to display the DX Tracker window while using another program, or you have a dual monitor system.
Saving a Scan Set
Scan sets can be named and saved for later use. For example, if you have created a scan set for your favorite frequencies, you can save it with the name "Favorites." You can open the scan set later to use it or modify it. Long scan set names, such as "FO0AAA Jim," can be used to describe the scan set.
To save a scan set, choose Save or Save As from the CommCat File menu. The Save option saves a scan set that is already open, while Save As allows you to rename a Scan Set or save a new one. The Save As dialog displays the contents of the Scans folder. Enter a name and click OK. (If you enter the name of an existing scan set, CommCat will ask you to confirm that you wish to overwrite the existing set.)
The Save and Save As options are also available on the right mouse menu.
Opening a Scan Set
Open the Open Scan dialog by choosing Open from the File menu. The Open Scan dialog opens and displays the contents of the Scans folder. Double-click a scan set, or select a scan set and click OK. The current scan set name is displayed in the caption bar of the DX Tracker window. When the scan set is open the radio is tuned to the center frequency that was saved with the scan set.
A second form of Open is provided on the right mouse menu. The Open Here option opens a scan set and translates the points to the current frequency. This option provides a way to open scan sets on different frequencies, such as when a DX operator changes his operating frequency but follows the same tuning pattern as before.
A scan file for the amateur radio beacons is provided with CommCat. This scan file tunes your radio to all beacon frequencies in turn, staying at each frequency for 3 minutes.
Copying the Scan Set to the Clipboard
Copy the scan set image to the clipboard by choosing Copy from the CommCat Edit menu. Once on the clipboard, you can paste the image into any document that can accept clipboard images, including a QSL card design or Word document.
Transferring Spots Automatically from the DX Spot Manager
The DX Spot Manager contains a sophisticated system of rules for testing new spots and performing actions when specified criteria are met. For example, you can monitor incoming spots for specific call signs, unworked entities, or spots that appear in a frequency range. The list of actions that can result includes an option to transfer the spot to the DX Tracker window.
The spot action can also determine the color used to show the spot, the shape of the spot, and the color of the corresponding s-meter. You can specify that certain spots will be show in green with a square shape, and other spots using yellow with a round shape. Note that these shapes and colors are also used for the map pins on the Great Circle Map window.
Analyzing DX Operating Patterns
The DX Tracker and Spectrum Analyzer windows, operating as a pair, make a powerful tool for analyzing the operating patterns of a DX operator as he/she works through a pile up. By understanding this pattern, the likelihood of making a successful contact is increased since you can often "second guess" where the DX operator will be listening next. This is especially true for CW DX pile ups where you can use the Spectrum Analyzer to monitor a band of frequencies that may encompass the entire pile-up.
Double-click each signal that the DX operator works to record the frequency in the DX Tracker window. A DX operator may use a "saw tooth" pattern, jump from one end of a pile up to another, or simply work a number of stations close to the same frequency before moving on. Once you have established the pattern, click the DX Tracker or Spectrum Analyzer on the most likely frequency.
Right Mouse Menu Summary
The DX Tracker right mouse menu provides additional functions. The menu is shown below.
![]()
Remove This Point |
Remove the scan point designated by the mouse pointer position. This option is disabled when the mouse pointer is not over a scan point. |
Reset Center Frequency |
Reset the center frequency of the scan set to the current rig frequency. This will change the frequencies of the scan points unless you set the transceiver frequency to one of the scan points first. To do so, click a scan point of interest, then choose Reset Center Frequency from the right mouse menu. This option is disabled when the mouse pointer is not over a scan point. |
Reset Alarms |
Reset all s-meter threshold alarms. |
Save |
Save the current scan set, replacing the previously opened scan set. |
Save As... |
Save the current scan set under a new name. |
Open... |
Open a previously saved scan set. Frequencies in the original scan set are preserved. |
Open Here... |
Open a previously saved scan set, and center the set on the current transceiver frequency. This is useful if you have created generic scans, such as a number of steps 2 KHz apart to search a band. |
Scan |
Choose a scan step interval. |