Overview
•CommCat controls radios through serial ports. Many radios require a level converter for proper operation. Up to 4 radios can be configured in CommCat.
•Morse code Keying can be done through a serial or parallel port. A simple interface circuit is required (see below). The K1EL WinKeyer may also be used with Radio A. CommCat supports the Elecraft K3 internal keyer in Radio A.
•The CommCat Spectrum Analyzer and recording functions require that audio from your radio be fed to the input of a sound card (such as a Sound blaster) in your computer.
•Optional PTT control of the radio can be done through a serial or parallel port.
•Several radios have advanced settings to set preferences.
Supported Radios
CommCat works with a wide range of radios. A list of supported radios is provided below. New radios are added after tests have shown compatibility, so this list may not be complete.
Yaesu |
FT100D, FT747GX, FT757GX, FT817, FT847, FT857, FT897, FT900, FT920, FT950, FT990, FT991, FT1000, FT1000D, FT1000mp, FT1000 Mark V, FT2000, FTdx1200, FTdx5000, FTdx9000 |
Kenwood |
TS440s, TS480, TS570, TS590s, TS850, TS870, TS950, TS2000 |
Icom |
IC706MKII, IC706MKIIg, IC718, IC725, IC735, IC746, IC746PRO, IC756, IC756PRO, IC756 PRO II, IC 756 PRO III, IC775, IC781, IC7000, IC7200, IC7300, IC7410, IC7600, IC7700, IC7800 |
Elecraft |
K2, K3, K3 + Sub Receiver, K3s, KX3 |
Collins |
KWM380 |
Ten Tec |
Pegasus, Jupiter (both with support provided through and external program such as N4PY), Orion, Orion II, Omni VI+, Omni VII |
Alinco |
DX77, DX-SR8 |
Ham Radio Deluxe |
Use HRD to control your radio and CommCat to help chase DX, feeding frequency and mode data to HRD |
Flexradio |
PowerSDR and SmartSDR Native |
Affeet |
OmniRig |
COMMSOFT |
CommCat VP, virtual port program. |
W1HKJ |
fldigi |
Serial Communications
Radios are controlled by CommCat through serial ports. (CommCat supports the Collins KWM-380 through a parallel port.) Some radios now feature USB ports for connection to your computer, or you can use a USB-to-serial adapter if necessary. In both cases, drivers are required to cause the USB connection to appear the same as a classic serial port.
Any serial port from 1 through 255 can be used. Many radios have fixed communication parameters, in which case CommCat sets the necessary Baud rate, data bits, parity and stop bits. These parameters can be specified in the File, Settings, Radio/Ant window for those radios that are adjustable. When the communications parameters are adjustable, it is generally best to set the Baud rate as high as possible to improve communications and control performance. It may be necessary to reduce the Baud rate if communications are unreliable.
Some radios require the addition of a level converter to adapt to RS-232 signal levels. Level converters are available from the rig's manufacturer or other suppliers for this purpose, or you can construct your own for a significant savings. Sample schematics are provided below.
IP Connection
Each radio selection has a special provision to connect to a radio through an Internet connection. This can be done using a native Ethernet port on a radio (such as the Ten-Tec Omni-VII) or through an Internet-to-serial adapter. Select Remote IP in the Port list and enter the IP address and port number for the radio in File>Settings>Radio/Ant>Radio A-D>port.
A variety of WiFi-to-serial and Ethernet-to-serial adapters are available commercially.
Omni-Rig
Omni-Rig by Afreet Software is a free utility for connecting to many popular radios and to other programs that support Omni-Rig. Some data commands used by CommCat are not presently supported by Omni-Rig, although you can add custom commands using Omni-Rig's flexible rig description system. For example, Omni-Rig does not support S-meter reading or the ability to set the mode for a second VFO. You can learn more about Omni-Rig by navigating to this link:
http://www.dxatlas.com/omnirig/
Radio Timeout
CommCat maintains a steady dialog with your radio. If the communications are interrupted for any reason--perhaps you turned off your radio--CommCat attempts to re-establish communications. A setting is available to override this timeout in File>Settings>Program>Startup.
Audio
The CommCat Spectrum Analyzer and CommCat's recording functions (Live users only) receive audio from your radio via the sound card in your computer. Many radios have a fixed-level audio output connection which is ideal for this application.
If your radio only has a connection for an external speaker, it may be necessary to use this audio source. If this is the case, provisions may have to be made to feed an external speaker in addition to the sound card. The audio level will vary as you adjust the volume control on the radio, which will cause the Spectrum Analyzer display to vary. A slider audio level control is provided on the Spectrum Analyzer window so the display can be adjusted.

If your radio has an external speaker jack, try inserting the audio plug into the audio jack far enough to pick up the audio signal, but not far enough to disable the internal speaker.
Use the stereo sound card Line Input if your radio provides left (tip) and right (ring) channels corresponding to the main and sub VFO's.
Open the mixer panel for your sound system and make sure the Line Input mute check box is not checked and that the volume slider is in the upper half of its range. If you are using the microphone input, open the Recording Control window and make sure the Microphone input is enabled and that the level control is at least in mid-range.
CW Keying
CommCat provides CW keying through a dedicated connection in a serial or parallel port. The serial port can often be the same port used to control the radio. You may also use the K1EL WinKeyer or Elecraft K3 with Radio A.
For connection to the serial port, use the circuit shown below. The 4N33 opto-isolator provides electrical isolation from the computer to your radio.
Use the schematic below for connection to a parallel port.
PTT
PTT (Push To Talk) control from CommCat can be done through the CAT data control stream, or through a dedicated connection in a serial or parallel port. The type of PTT control can be specified in the File>Settings>Radio/Ant window. Not all radios support PTT Control though the CAT data stream.
Special Considerations By Manufacturer
Yaesu
The 1000MP and later rigs have RS-232 ports which do not require a level converter.
An advanced setting is available for the Yaesu rigs that allows you to set the port parameters and a preferred sideband for the CW mode. Open the Yaesu Advanced Rig Settings window from the File, Settings, Station, Radio/Ant window. Yaesu radios normally receive CW in the upper sideband (USB) mode. Select LSB to have CommCat use the LSB mode by default.
Icom
Icom radios require additional settings. Each Icom radio is assigned a unique hex address, and for many models, it is possible for you to change this default assignment through its menu. Enter the actual address used by your radio in the Advanced Port Settings window. Use two digits for the hex address, and do not include H.
Some Icom CI-V interfaces require that the RTS or DTR lines on the port be held high. (The circuit below requires that DTR be held high.) If your interface requires that either or both lines be held high, check the appropriate box. Finally, some Icom radios, such as the 775, have a great deal of flexibility in their filter settings. The CW and SSB filter settings can be customized for radios that require it.
The CI-V interface allows more than one Icom radio to be connected to a single serial port. CommCat normally prevents you from assigning more than one radio to the same serial port. When Icom radios are installed, CommCat alerts you when you assign more than one radio to the same port, but allows you to proceed.
The CI-V Transceive and CI-V with IC-731 options in your Icom radio menu must be turned off.
The IC7800 retains filter settings for each mode so the CommCat filter settings are disabled for this radio.
Icom Interface by G3VGR
The Icom Interface shown below provides a simple way to connect your computer to an Icom radio. The resistors labeled 4k7 are 4700 ohm 1/8-watt resistors. This circuit uses the serial DTR line for power, so be sure to set the DTR High option in the Radio settings window. Dave, G3VGR, has given permission to include this circuit diagram in the CommCat manual.
Kenwood
Some Kenwood radios allow you to set the serial communications Baud rate higher than 4800. Click Advanced... on the Radios settings window to choose another Baud rate. Most Kenwood radios require that the DTR line in the serial port be held high. This option is available in the Port>Advanced radio settings window.
Elecraft
The Elecraft KI02 Aux I/O option and firmware 2.01 or higher are required for computer control of the K2.
Two advanced CommCat settings are provided for the K2. The advanced settings are reached by going to File>Settings>Radio/Ant>Radio A>Port window and clicking Advanced.
The first advanced setting controls your preferred filter choices for CW and SSB. The second provides a way to set a preferred sideband for CW operation.
Four band pass filters can be present in the K2. The CommCat Spectrum Analyzer window has buttons to select "wide" or "narrow" band passes. The filter setting has provisions for setting a preferred filter for CW narrow, CW wide, SSB narrow and SSB wide.
The K2 receiver design uses lower sideband (LSB) in the CW receive mode for frequencies below 21MHz, and upper sideband (USB) at and above 21MHz. Use the CW Sideband setting to choose the K2 design, USB for all bands, or LSB for all bands. When you choose USB, the K2 will show the mode as CWr (CW reverse) on CW frequencies below 21 MHz. With LSB the K2 will show CWr on 21 MHz and above. If you wish to use the CommCat Spectrum Analyzer with the K2, many prefer to use USB since pile ups generally use "split up".
Ten-Tec
Some Ten-Tec radios use the same communications control as Icom radios. Check your manual to see if you can use your Ten-Tec radio with CommCat by selecting Icom.
The Pegasus and Jupiter radios interface with CommCat through a third-party program, such as that provided by N4PY. Set the path to the control program in the Ten Tec Advanced Settings window. Start the control program before you start CommCat.
The Orion, Orion II, and Omni VII are directly supported by CommCat.
Collins KWM380
The Collins KWM380 has limited control of operating frequency through the keypad port when that option has been added. The interface operates through a parallel port. CommCat uses LPT1 to control the KWM380.
Parallel Connector |
KWM380 Keypad Connector |
|---|---|
2 |
1 |
3 |
2 |
4 |
3 |
5 |
4 |
6 |
5 |
7 |
6 |
8 |
7 |
9 |
8 |
18-25 |
10 |
In addition to the connections in the table above, the following loop back jumpers are also required on the computer end of the KWM380 control cable for Windows NT and XP computers:
•1 to 13 (Strobe to select)
•10 to 16 (ACK to INIT)
•11 to 17 (BUSY to SLCTIN)
•12 to 20 (PAPER END to GND)
FlexRadio 6xxxx and SmartSDR
As shown below, a button labeled 'Slice B' is added to the Split toolbar when using the FlexRadio 6xxxx radio.
![]()
This button allows you to have two active slices on different bands at one time. When you log, CommCat uses the transmitting slice for both the transmitting and receiving frequencies. For example, if slice A is on 15 and slice B is on 20 and set to transmit, the logging frequencies will both be determined by slice B.
Selecting a Radio
Four radios can be configured in CommCat. The radio you wish to be active is selected from the Rig toolbar or from the File menu. You may also turn off control to all radios by selecting Off. The hot keys Ctrl+Shift+A through Ctrl+Shift+D can be used to enable a radio or use Ctrl+Shift+N to disable all radios.
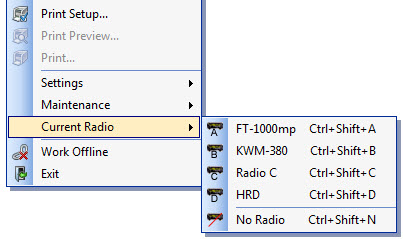
Radios that are not configured are dimmed in the toolbar and menu.
To activate the Rig toolbar, right-click over the Navigation toolbar and select Rig.
Diagnostic Logging
CommCat provides a way to log that data going to and from your radio. This tool is handy if you are trying to troubleshoot a connection. To enable this logging, put a check in Log Rig Control in File>Settings>Program>Startup>Diagnostics. Restart CommCat and attempt to control the radio. Exit CommCat and look for the file named rclog.txt in My Documents\COMMSOFT\CommCat\Logs. You can open the log with Microsoft Notepad to view its contents.